The Importance of Copyediting and Proofreading
February 27, 2024

Secure Your ASP Core Application Secrets with Azure Key Vault
Introduction
Modern web application frequently requires integration with external services of some type. Database servers and external APIs are two of the most common examples. For an application to communicate with these external services, they usually require a secret (a connection string, username/password, or API key) to authenticate the application with that external service. So how do we keep the application secrets secure? This article will explain the reasons for using an Azure Key Vault to store sensitive information and provide a comprehensive step-by-step demonstration of using the Azure Key Vault.
What is Azure Key Vault?
Azure Key Vault is a tool for securing and storing your application secrets available on Microsoft Azure. Keys vault are secure, highly available, and use multiple layers of redundancy to ensure your keys and secrets are always available to your application.
When designing an application, an application architect will consider how to store sensitive information that shouldn’t be stored with other (less-sensitive) configuration settings. Ensuring that your API keys, passwords, or other sensitive information are never recorded into your application’s source code repository.
Rule #1 is that you should NEVER store this sensitive information directly in the source code. It’s all too common however, for configuration data such as API keys to be stored in application configuration file (appsettings.json) and these configuration files are usually stored with the rest of your application in the source code repository. If you store sensitive information in the appsettings.json (or other configuration files), you’ve now lost control of that sensitive data, where it gets stored, and who may get access to it.
Therefore you should store your application secrets somewhere separate from your source code. Besides keeping your secrets out of the source, you also maintain a higher level of control over those secrets. Azure Key Vault access control allows the IT administrator to provide read-only access to developers or contractors, but neither can change, delete, or create new secrets. Additionally, IT admins can easily revoke access to users or applications when access is no longer needed.
Now that we understand what the Key Vault does and why it’s so important, the remainder of this article will provide a complete walk-through of creating and using an Azure Key Vault to store and access a secret.
A quick summary of what’s covered in the rest of this article:
- How to create an Azure Key Vault
- How to store a secret into the Key Vault
- How to grant access to a user or application
- How to request a secret from an application
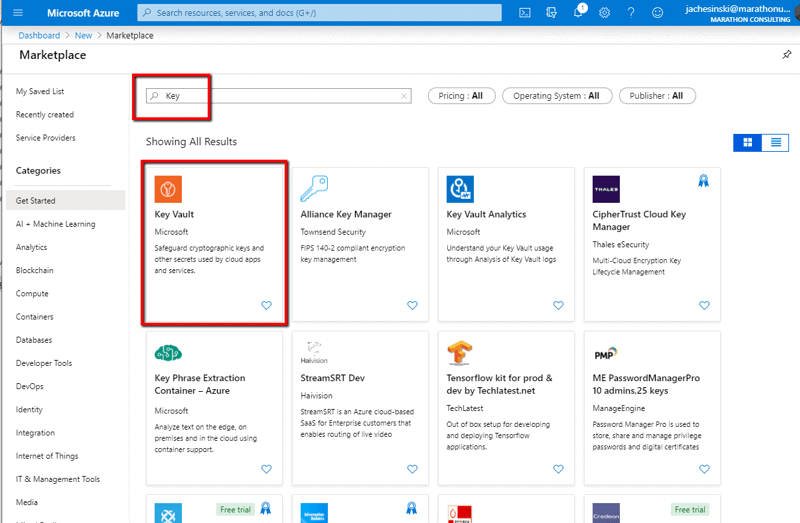
STEP 1 – Creating an Azure Key Vault
Login to your Azure portal and add a new resource, enter ‘Key’ into the search bar, then select ‘Key Vault’ from the resources that are displayed.
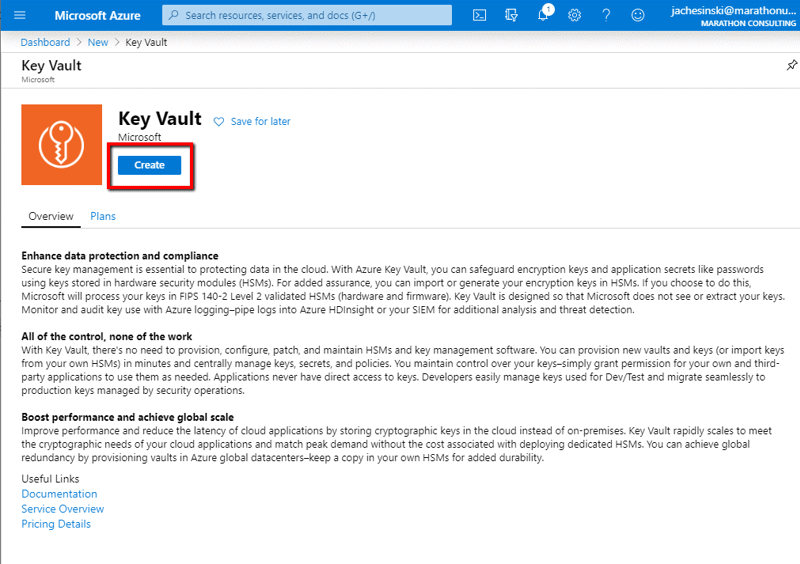
Click Create
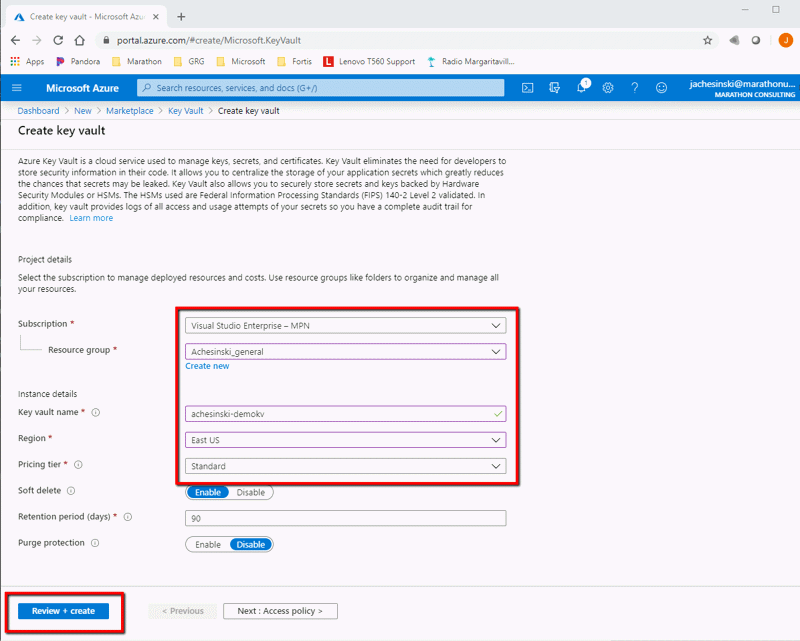
For the purposes of this article, we’ll only complete the basic information needed to create the Key Vault, then click ‘Review + Create’
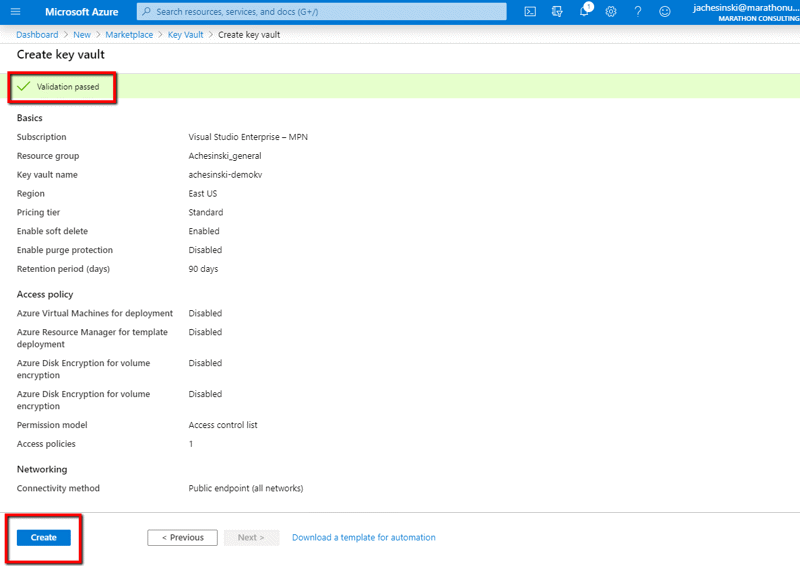
After passing Validation, click ‘Create’ to have Azure build the key vault resource.
After a few minutes, the Azure portal will display a screen than confirms the key vault has been created.
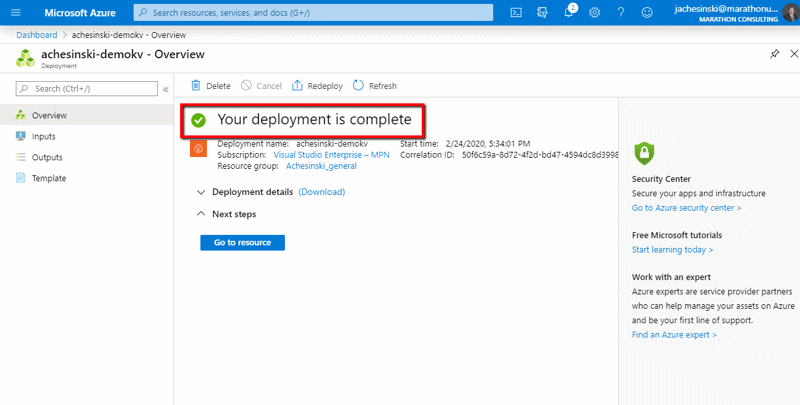
Step 1 COMPLETE – We’ve now created a vault for storing our application secrets.
Step 2 – Storing a secret into our key vault
There are many different types of secrets that can be stored in the key vault including encryption keys, secret values, and certificates. Providing an in-depth explanation of each of these is beyond the scope for this article. For our demo application, we’ll create, populate, and retrieve a secret. This could be a password or API key that you would use in your application.
From the Key Vault blade, select Secrets from the left panel, then click ‘Generate/Import’.

Complete the form that appears providing a name and value for your secret.
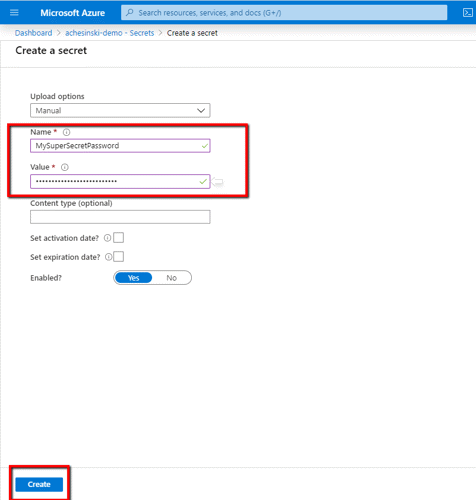
Click ‘Create’ to store your secret.
STEP 2 COMPLETED – We’ve now created a secret in our key vault.
Step 3 – Granting access to your key vault
Having a key vault doesn’t do us any good unless someone has access to it. However, we need to ensure only the right people or applications are granted access.
Now we need to understand who needs access to the vault.
- As a developer, I need access to the vault while I’m developing the application.
- Once deployed into production, the application instance will need access to the vault.
From a development standpoint, I can grant myself access to the Key Vault so I can use it during development.
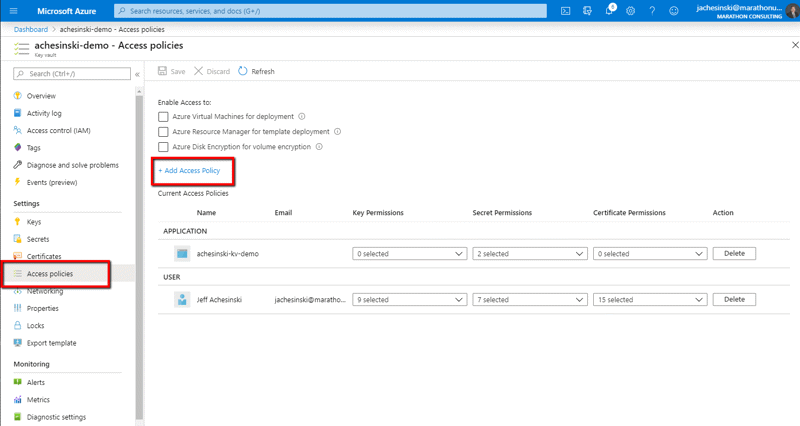
To grant a developer access to the vault, select ‘Access Policies’ from the left panel of the Key Vault, then select ‘Add Access Policy’.
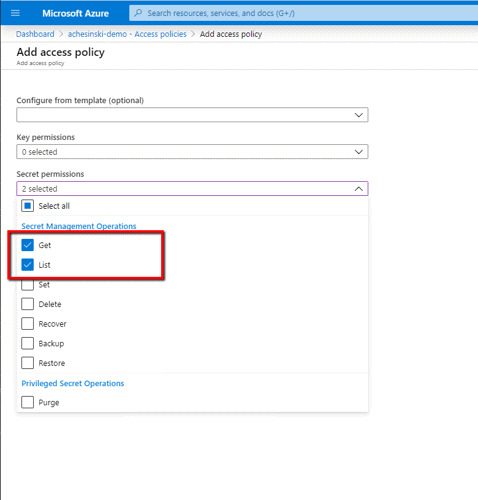
Complete the form that appears… In this case, the developer doesn’t need full access to the KV, so we’ll grant the developer Get & List permission, but not any of the others (our developer won’t be able to create, change, or delete any secrets in the vault).
Once the permissions are set, select the user, users, or groups that will be associated with this access policy.
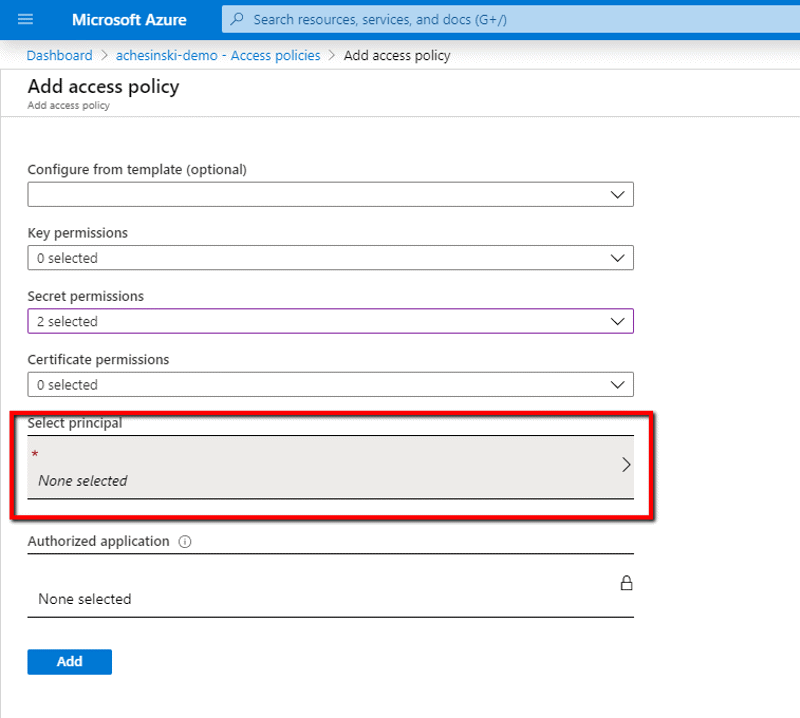
Click ‘Add’ to add this access policy to the vault.
Now we’ve granted a user (or AAD group) access to our vault, what about the production application?
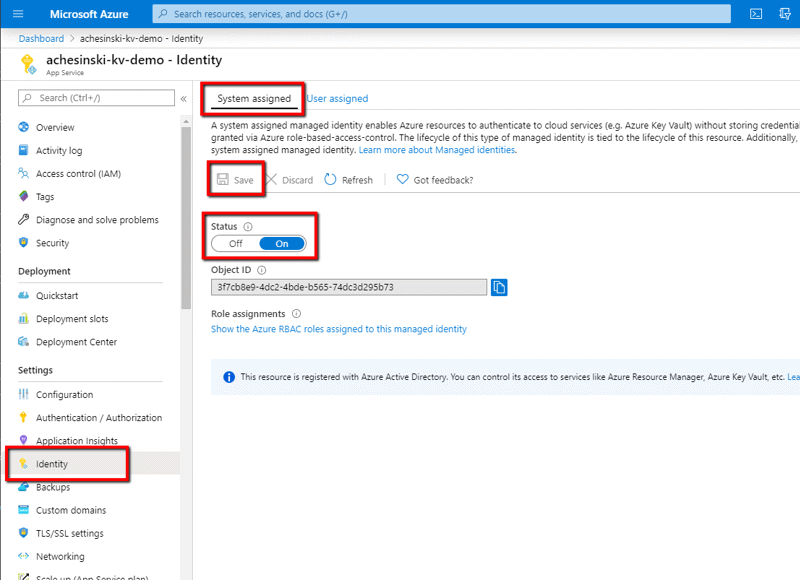
For this article, I’ve created a demo application as an Azure Web Service. While simple, the steps to create the web application are outside the scope of this article. However, there is one required step once the app service has been created.
You must enable the Managed Identity for the app. To do this, open the web application in the azure portal, navigate to the ‘Identity’ blade and enable the ‘System Assigned’ identity. MAKE SURE TO CLICK ‘SAVE’.
Now go back to the ‘Access Policies’ blade for the key vault and add another policy. Select the appropriate permissions. Click on ‘Select Principal’. This time we’re going to enter the name of the application.
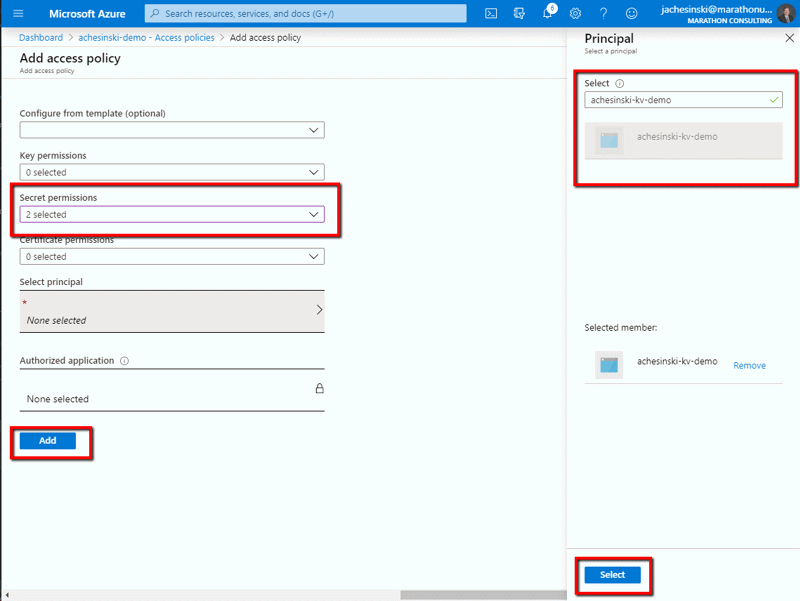
Click ‘Select’, then ‘Add’ to add the new policy to the vault.
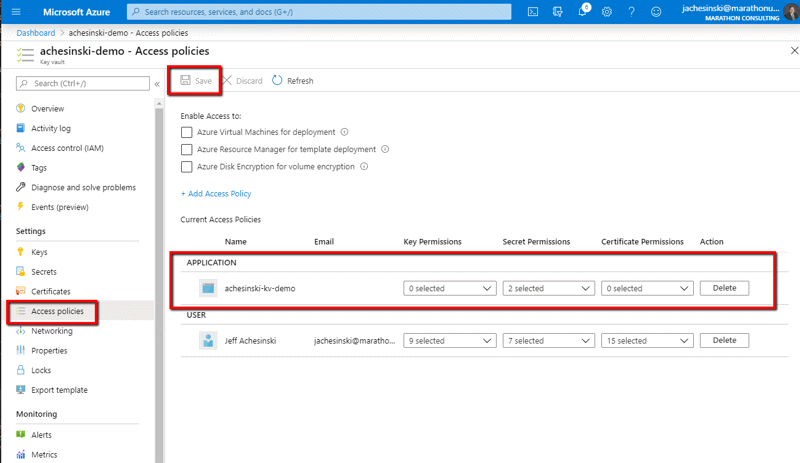
If you’ve added the application successfully, you should see the application listed (as shown below).
BUT THERE’S ONE MORE STEP --- YOU MUST CLICK SAVE ON THIS PAGE TO SAVE THE NEW POLICY.
Step 3 COMPLETE – We’ve granted access to the key vault to our developer and the application.
Step 4 – Accessing the key vault from our application
Finally, we’re ready to access the secret data in our Key Vault from our application.
There are different ways to access the data stored in the Key Vault. One way to access it is to use the ConfigurationManager as though it was configuration data stored in appsettings.json files.
For this application, we’re using the standard C# ASP CORE MVC application template. Once the project has been generated from the template, add the following Nuget packages:
- Azure.KeyVault
- Extensions.Configuration.KeyVault
- Azure.Services.AppAuthentication
In Program.cs, call the ConfigureAppConfiguration method as shown here to get access to the key vault from the application.
public static void Main(string[] args)
        {
            CreateWebHostBuilder(args).Build().Run();
        }

        public static IWebHostBuilder CreateWebHostBuilder(string[] args) =>
            WebHost.CreateDefaultBuilder(args)
            .ConfigureAppConfiguration((hostingContext, config) =>
            {
                var azureServiceTokenProvider = new AzureServiceTokenProvider();
                var keyVaultClient = new KeyVaultClient(new KeyVaultClient.AuthenticationCallback(azureServiceTokenProvider.KeyVaultTokenCallback));
                config.AddAzureKeyVault("https://achesinski-demo.vault.azure.net/", keyVaultClient, new DefaultKeyVaultSecretManager());
            })
            .UseStartup<Startup>();
Inject the configuration manager into the desired classes using Dependency Injection. Then read the secret from the key vault using the configuration manager and the name of the secret we created back in step 2 (‘MySuperSecretPassword’).
public class HomeController : Controller
{
IConfiguration configuration;
public HomeController(IConfiguration c)
{
configuration = c;
}
public IActionResult Index()
{
ViewBag.MySuperSecretPassword = configuration["MySuperSecretPassword2"];
return View();
}
public IActionResult Privacy()
{
return View();
}
[ResponseCache(Duration = 0, Location = ResponseCacheLocation.None, NoStore = true)]
public IActionResult Error()
{
return View(new ErrorViewModel { RequestId = Activity.Current?.Id ?? HttpContext.TraceIdentifier });
}
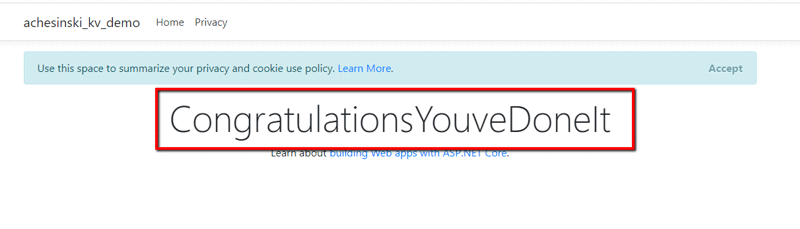
}Then modify the default index view to display the value. (You wouldn’t normally display secrets from the vault on the page, this is just to demonstrate that we’ve read the data.)
<div class="text-center">
    <h1 class="display-4">@ViewBag.MySuperSecretPassword</h1>
    <p>Learn about <a href="https://docs.microsoft.com/aspnet/core">building Web apps with ASP.NET Core</a>.</p>
</div>
Once I publish the application out to Azure, it displays the value we read from the vault.
Step 4 is COMPLETE – We’ve written an application that securely reads secret values from an Azure Key Vault and uses that data in our application.
Wrapping up
Now that you understand the need for the Azure Key Vault and how to use it, go forth and be secure!
One last thing...
If your enterprise has different resources for different environments, use multiple key vaults. For example, use one Key Vault for development, another for QA/Test, and a third for production. Then use your app config file to provide the URL of the corresponding Key Vault for that environment.

Jeff AchesinskiCore Contributor
Senior IT Consultant
Jeff Achesinski is a Solution Architect at Marathon Consulting and a Microsoft Certified Solutions Developer (MCSD). He has been working as a software developer in Virginia Beach for over 30 years. Jeff also spent 15 years as a volunteer scuba diver at the Virginia Aquarium and served on the Board of Directors for Kempsville Volunteer Rescue Squad. He lives in Virginia Beach with his wife, April.