The Importance of Copyediting and Proofreading
February 27, 2024

Creating and Signing Contracts with Aspose and DocuSign
Introduction
The need to automate manual and paper-based processes is something we frequently run into when architecting solutions for our clients. In this post, we’ll dive into one particular process a client had with annual contracts for their customers that was almost entirely paper based and how we were able to automate it and deliver them a big win with their customers with the onset of the COVID-19 pandemic.
The Problem
This client had a legacy desktop system that was distributed across 80+ locations that basically ran their business. Part of that legacy system would print 3 copies of a contract for a customer (one copy for corporate, one for the location, and one for the customer) with some information filled in from the system’s database (customer name, address, etc.). The printed contract would then need to be reviewed and signed in person by the customer. Once the copies were signed, information in the legacy system was updated to indicate the contract was signed and the signed copies went off to file cabinets at the location and corporate, leaving one with the customer.


While this process worked, there were several pain points the client had.
Expensive Printing Costs
With 3 copies of a long document on legal-size paper being printed for thousands of customers, the consumable costs of paper, ink, and maintaining printers was very high. Additionally, there was a desire on the client’s part to be more eco-friendly and go paperless with contracts if possible.
Contract Changes Were Burdensome
There were 16 different types of contracts that were updated at least once a year, but the contract templates were embedded in the legacy application. This meant that even if one word in one contract need to be changed, it required a code push to 80+ locations, which was time consuming and expensive.
Signing Contracts In Person
Having paper-based contracts meant that every customer had to come into a location to physically sign the contract. This meant having the cost of staffing and scheduling those customers to come into a location. Additionally, while we were in the middle of development on this project, the COVID-19 pandemic hit, so having customers show up to sign a contract in person was no longer ideal.
The Solution
There were several goals we had in mind for this solution:
- The contract documents should be in a format that can be easily changed by the end user.
- Changes to a contract document should not require a code push to the application.
- The contracts should be digitally signed.
- Automate as much of the process as possible.
Contract Documents
In the legacy system, the contracts were embedded into the application as form-fillable PDF documents. From past experience, we knew it was not ideal to maintain these in PDF format due to the Adobe Acrobat licensing costs and the convoluted way that the program allows you to edit document text and the fields that are filled in.
Since we were replacing the legacy system with a custom-built ASP.NET Core web application, we quickly settled on Aspose.Words for .NET as a solution. This would allow us to create the contract documents in Microsoft Word and allow the end users to maintain and update the contract documents with Microsoft Word. With Aspose.Words for .NET, we can open and manipulate Microsoft Word documents in memory, perform find and replace operations for our form fillable fields, and save the Word documents in PDF format.
So, let’s take a quick look at some of the code for this process.
You must include the Aspose license file with your deployment. We store it in the application’s App_Data folder.
// set a reference to the license file
var lic = new Aspose.Words.License();      lic.SetLicense($"{appdata}\\Aspose.Words.NET.lic");
Next, we are just opening up the contract template Word document in memory using Aspose.
// open the contract Word template
var contractDoc = new Aspose.Words.Document($"{appdata}\\ContractTemplate.docx");
Now we can fill in information about the contract from the database contract record. The approach we took here was to wrap all of the data fields we want to insert into the Word document from the database with a character string that is not present in the contracts. We settled on %<>% figuring that character string is unlikely to appear in a contract. With that in place in the Word template, we use the find and replace capability of Aspose.Words to find all occurrences of the text string %<Year>% and replace it with the contract year from the database record. There are many more lines of code than this to get our database data into the contract document, but you get the idea.
// find and replace our form fillable fields with data from the database
contractDoc.Range.Replace($"%<Year>%", contractDetails.ContractDate.Year.ToString(), new Aspose.Words.Replacing.FindReplaceOptions(FindReplaceDirection.Forward));
Finally, we save the Word document in PDF format. For the sake of simplicity, the example above saves it to the App_Data folder, but there are many approaches that can be taken here, including saving to file storage, Blob storage, or a stream that can be downloaded in the user’s browser.
// save the contract in PDF format
contractDoc.Save($"{appdata}\\{contractFileName}", Aspose.Words.SaveFormat.Pdf);
Signing Documents
We would like the customer to be able to digitally sign the contract document we created in order to avoid printing. The leading choice here is DocuSign and our client already had experience using DocuSign at their corporate headquarters.
Setting up DocuSign could easily be an entire blog post, so we will not go into the details here. The important thing to note is that we used their eSignature API which allowed us to easily integrate digital signing into our custom-built application. There is a lot of great documentation and a quick start guide over on the DocuSign Developer website.
We utilized the C# SDK, which is available as a NuGet package or on GitHub to communicate with DocuSign via our developer account credentials using their API. Let’s take a look at the code.
The first step is to create a new API client for DocuSign.
// instantiate a DocuSign API Client
var apiClient = new ApiClient();
Configuration.Default.ApiClient = apiClient;
Now add an authentication header to the ApiClient object. You’ll need to have the email address, password, and integration key for your DocuSign developer account.
// instantiate a DocuSign API Client
string authHeader = "{\"Username\":\"" + dsUserName + "\", \"Password\":\"" + dsPassword + "\", \"IntegratorKey\":\"" + integrationKey + "\"}";
Configuration.Default.AddDefaultHeader("X-DocuSign-Authentication", authHeader);
Next, we are going to create a Document object so we can attach the contract to our API POST. We pass in the full path and file name to our contract PDF, which is converted to a Base64 string, and set a few other options, including a name, a type, and a document ID we assign.
// create the document
var document = new Document
{
DocumentBase64 = Convert.ToBase64String(ReadContent(contactFileAndPath)),
Name = $"{contractFileName}",
FileExtension = "pdf",
DocumentId = "1"
};
var documents = new Document[] { document };
We now need to set up our Signers object, which identifies who gets sent the email from DocuSign, letting them know they need to sign this contract. We also define the Sign Here tab, which places the signature placeholder in the document.
// create a signer object
var s = new Signer
{
Email = "customer_email@wherever.com",
RecipientId = "99999",
Name = "Customer Name",
Tabs = new Tabs
{
SignHereTabs = new List<SignHere>
{
new SignHere
{
DocumentId = "1",
PageNumber = "1",
RecipientId = "99999",
AnchorString = "By 99999",
AnchorUnits = "pixels",
AnchorXOffset = "25",
AnchorYOffset = "5"
}
}
}
};
var recipients = new Recipients { Signers = signers };
We set up the Event Notification object to allow DocuSign to send us notifications back to our custom-built application API. This allows us to receive statuses from DocuSign on when they send out the email alert to the customer telling them there is a contract to sign, when the customer opens the email, when the customer signs the document, etc. This is optional, but we felt like it was necessary to give our application insight into what part of the signing process a document was in.
// set up the event notification settings
var en = new EventNotification();
en.Url = apiUrl;
en.LoggingEnabled = "true";
en.RequireAcknowledgment = "false";
en.UseSoapInterface = "false";
en.IncludeCertificateWithSoap = "false";
en.SignMessageWithX509Cert = "false";
en.IncludeDocuments = "false";
en.IncludeEnvelopeVoidReason = "true";
en.IncludeTimeZone = "true";
en.IncludeSenderAccountAsCustomField = "true";
en.IncludeDocumentFields = "true";
en.IncludeCertificateOfCompletion = "false";
en.EnvelopeEvents = new List<EnvelopeEvent>
{
  envelopeevent("sent"),
  envelopeevent("delivered"),
  envelopeevent("completed"),
  envelopeevent("declined"),
  envelopeevent("voided")
};
en.RecipientEvents = new List<RecipientEvent>
{
  recipientevent("Sent"),
  recipientevent("Delivered"),
  recipientevent("Completed"),
  recipientevent("Declined"),
  recipientevent("AuthenticationFailed"),
  recipientevent("AutoResponded")
};
Now we create an EnvelopeDefinition which defines the overall container that we are sending to DocuSign, passing in our documents, recipients, notifications, and a few custom fields.
var envelopeDefinition = new EnvelopeDefinition
{
  EmailSubject = $"Signature request for Contract 3939455",
  Documents = new List<Document>(documents),
  Recipients = recipients,
  Status = "sent",
  EventNotification = en,
  CustomFields = new CustomFields()
  {
    TextCustomFields = new List<TextCustomField>()
    {
      new TextCustomField
      {
        Name = "ContractID",
        Value = contractid,
        Required = "false",
        Show = "false",
        FieldId = "ContractID"
      }
    }
  }
};
Finally, we are ready to send the contract to DocuSign using the CreateEnvelopeAsync method and passing in our DocuSign account identifier and the Envelop object.
var envelopesApi = new EnvelopesApi(apiClient.Configuration);
var results = await envelopesApi.CreateEnvelopeAsync(accountId, envelopeDefinition);
At this point, DocuSign takes care of the rest of the process of getting the contract signed for us. Because we defined event notifications, DocuSign will post messages back to our API to give us updates on the status of the signing process. Once the process is complete, DocuSign will give us a final update and we will be able to download the signed PDF contract document.
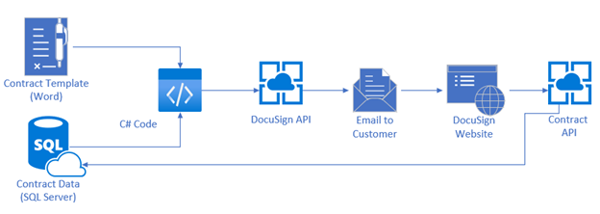
Solution Overview
Below are the simplified steps and view of the contract generation and signing process.
- An application user initiates the signing process that creates the contract document based on a template in Word and contract data in a contract record in the application’s SQL Server database.
- The contact document is sent to the DocuSign API set up for this application.
- DocuSign generates and sends an email to the customer, letting them know they have a contract to sign.
- The customer clicks on the link in the DocuSign email, which takes them to the DocuSign website where they sign the contract.
- DocuSign generates an API POST to our application API indicating that the contract has been signed by the customer.
- Our API method updates the SQL Server database contract record to indicate that the contract has been signed and saves a copy of the signed contract in file storage.
Conclusion
Automating manual processes requires a solid approach to analyzing the client’s problems with the current process and wishes for the automated solution. With those in hand, choosing the right technical approaches for the process ensures that the solution will be maintainable and scalable in the long term. Before this solution was delivered, the client was anticipating that 50% of its customers would choose the paperless option in the first year, but we exceeded expectations by having close to 90% of customers choose this option. COVID-19 certainly played a role, but they have not seen those numbers go down over time. The client has considered this a successful implementation with reduced costs across locations, reduced burden on their staff, and customers happy to have a paperless option for contract signing.

John HadzimaCore Contributor
John Hadzima is a Solutions Architect and Team Lead at Marathon Consulting. A graduate of Old Dominion University with a BSBA in Information Systems, he has been working as a developer in Hampton Roads for over 20 years with a focus on delivering solutions using the Microsoft Stack. When not coding, John enjoys surfing, skiing, biking, golfing, travel, and spending time with his two boys.