Semantic Versioning in Azure DevOps: Automating Version Management with semantic-release-ado
July 09, 2026
Make your own Smart Mirror with Magic Mirror and a Raspberry Pi
This past holiday season, I decided I wanted to do something a little different for my wife’s gift. I wanted to create something that combined my tech skills with my attempt at being a woodworker. I figured this would be more meaningful than a pair of socks and some stale candy canes. After some research and inspiration, I finally landed on the right project: a smart mirror. This particular smart mirror uses Raspberry Pi and MagicMirror.
Depending on how deep you want to get with things you can build your own over the course of an afternoon or two. If you’re feeling especially adventurous you could spread it out over a week or three while #stayingathome or over a holiday break.
So... What’s a Smart Mirror?
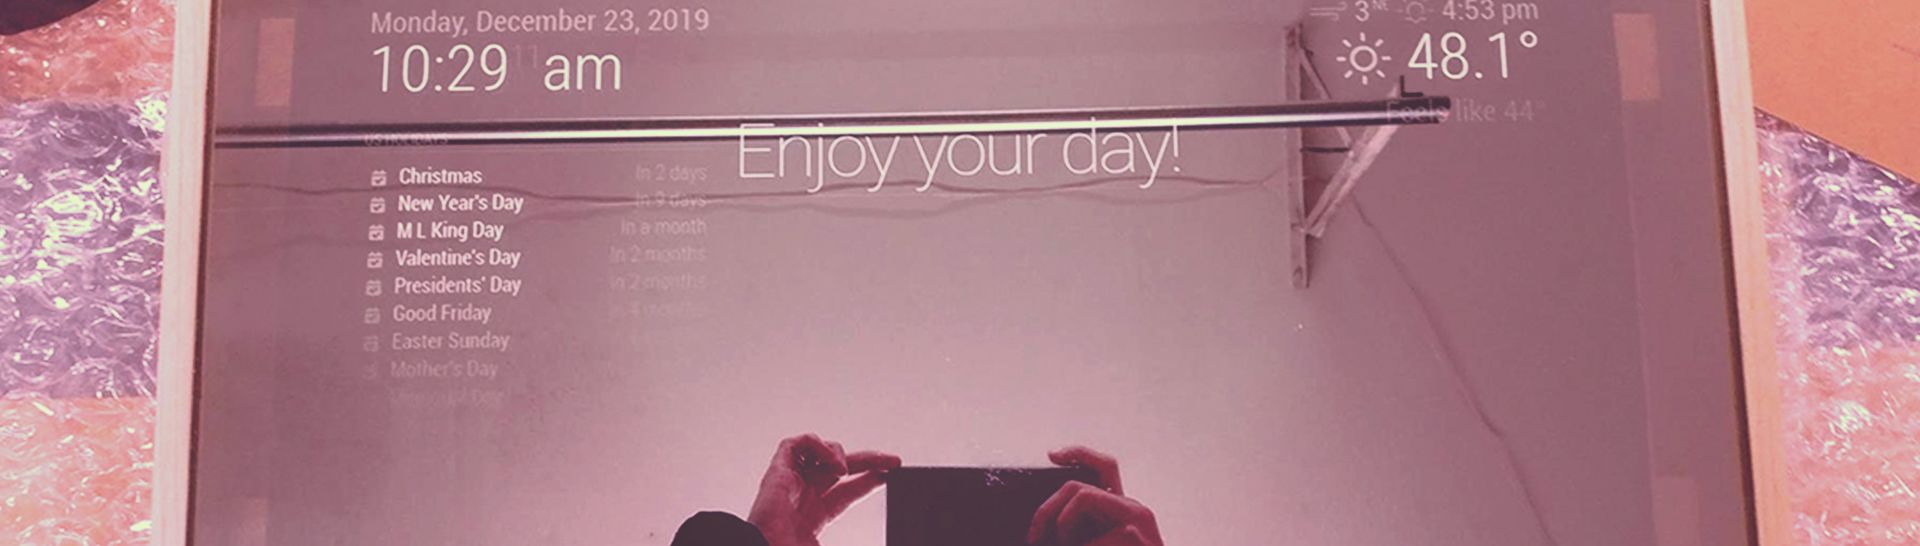
Well, a smart mirror is a dual-function mirror with a display behind it that presents multimedia and information while still functioning as a mirror. They can be used to show stats, weather, photos, traffic commute estimates, transit schedules, entertainment, and any other kinds of things you can imagine.
Wrap It Up and Put a Bow on It
The combo of the Raspberry Pi and MagicMirror seemed like a good homemade gift idea since I was already familiar with Raspberry Pi as a platform. This saved me a lot of time getting it all set up quick. The biggest time suck for me was building the frame (twice) and setting up all the different API keys for the various services that would feed data into the modules I selected.
This project was a ton of fun and I learned a lot about woodworking and Raspberry Pi. My wife was totally surprised by the result and appreciated all my effort. We both think it’s super cool and useful when getting ready each morning.
There are so many possibilities for extending the interface, hardware, and modules for the MagicMirror. Have fun with this intro and I hope you find what works best for you!
Measure twice, cut once…
The hardware supply list is pretty straightforward:
- Frame
- Mirrored security glass
- Raspberry Pi 3 with micro SD card
- Slim bezel PC monitor with HDMI input

I could have bought everything prefabricated, but I decided to buy a router (the woodworking kind), some clamps, and along with a few other implements to make my own frame. I used poplar wood from the local hardware store to build the frame. It’s relatively hard and could support the weight of the glass and monitor. You can also use mirrored acrylic glass instead of security glass to save on expense and weight.
I did some research on YouTube to learn a simple approach making a frame. I basically just used the router to make a channel where the glass would sit in the frame. The first attempt I made a perfect looking frame, but it was a quarter inch too short on all sides and the glass would not fit. Doh! Measure twice, cut once…
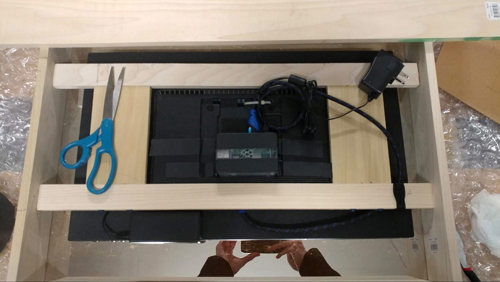
After getting the glass mounted in the frame, I positioned the monitor where it seemed to look right. I also made a wood support inside the frame to mount the monitor and Raspberry Pi onto. I used gaffer’s tape to keep everything in place temporarily.

From Hardware to Software
Set Up Your Raspberry Pi
First thing we need to do is get the Raspberry Pi set up and ready. If you’ve already got a fully set up Raspberry Pi, then skip this section.
I set up the Raspberry Pi using Raspian OS with the Raspberry Pi Imager. This tool burns the OS onto your micro SD card, so it will boot when you start the Raspberry Pi. To get the remainder of the system set up, I followed this guide.
Once you get your OS installed, you will need to configure your system for WiFi, among other things. This guide makes it straightforward to get all of your preferences set up. It’s very important that you install the system updates before moving on to installing MagicMirror!
Now we have a functional Raspberry Pi that is connected to the Internet.
I did two more things in order to access my Raspberry Pi remotely on my network:
- Enable SSH on Raspberry Pi: this allows you to connect to the Linux shell terminal remotely so you can run commands and administer the system.
- To use this, you will need a SSH client on your phone or PC. I used Putty for this, but there are many other SSH client applications available.
- Enable VNC on Raspberry Pi: this allows you to connect to the desktop remotely and use your mouse and keyboard just like you were in front of the Raspberry Pi.
- To use this, you will need a VNC client on your phone, browser, or PC. I used TightVNC, but there are many others that are available.
Now that all the grunt work is out of the way we can finally get to the fun part!
Mirror, Mirror on the Wall
Now that we’ve got our Raspberry Pi all sorted, we can move on to the interesting stuff.
I’m a fan of doing as little manual work as possible, so I relied heavily on using one of the unofficial install scripts for MagicMirror.
To use this, I connected using Putty to the IP address of my Raspberry Pi and used the default port of 22 for SSH. It looks something like this once you initially connect:
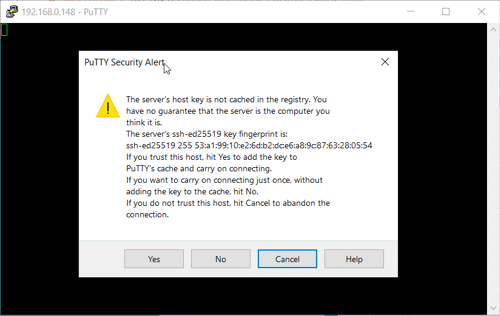
Click yes if you would like to proceed with your connection.
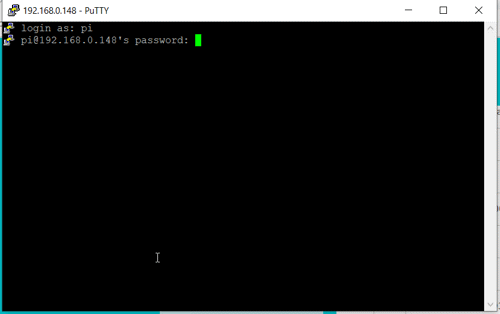
If you set your Raspberry Pi up with the default user account, the username you will use to login is just “pi” and your password is the password that you set during the initial setup of your OS.
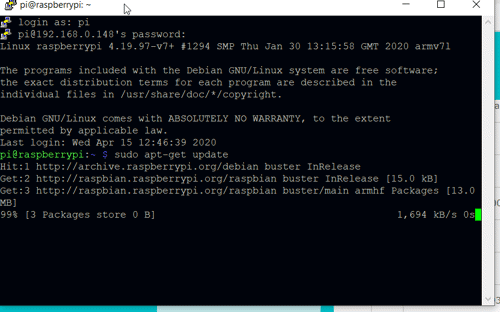
The first thing I did after connecting is re-running the update command:
sudo apt-get update
This will make sure that your system is as up-to-date as possible.
Now we can assume our system is up to date and run the unofficial setup script:
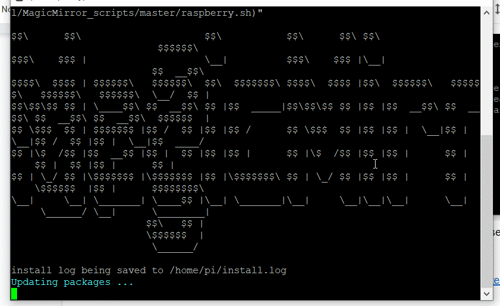
bash -c "$(curl -sL https://raw.githubusercontent.com/sdetweil/MagicMirror_scripts/master/raspberry.sh)"bash -c "$(curl -sL https://raw.githubusercontent.com/sdetweil/MagicMirror_scripts/master/raspberry.sh)"

This script aims to automate the process of checking the pre-requisites, ensuring proper versions are present, and putting the MagicMirror software on your Raspberry Pi system.
You should see something similar to this while it runs:
If all goes well, you should see this towards the conclusion of your setup:

This is asking if you would like to use pm2, a process manager for nodejs applications, to auto-start MagicMirror when your system boots up. Choose Y/N depending on your preferences.
Next, you’ll be prompted to choose whether to disable the screensaver or not:
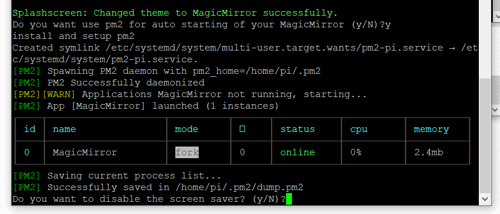
Disabling the screensaver helps your MagicMirror work as intended without the display/monitor unexpectedly turning off.
All done! Now you’ll see the following:

At this point your MagicMirror may have already started. If not, you can run:
pm2 start ./MagicMirror
pm2 start ./MagicMirror
Your display connected to the Raspberry Pi should look something like this now after starting with default modules:

Customizing your MagicMirror
Great! Now everything we need to start has been installed and we are ready to customize it with a few new modules.
Software you’ll need on your PC to remotely configure the Raspberry Pi and MagicMirror:
- SSH Client: Putty
- FTP/SFTP Client: Filezilla (optional, but highly recommended)
- Text Editor: Visual Studio Code (optional, but highly recommended)
I have set up ssh/sftp so I am editing my file on my laptop PC and publishing it back to the Raspberry Pi.
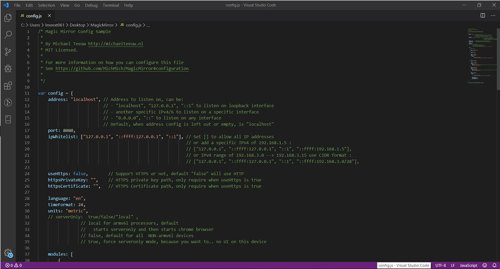
MagicMirror Configuration
MagicMirror uses a single configuration file located in /home/pi/MagicMirror/config/config.js on your Raspberry Pi. This is where you will be defining your enabled modules and changing the options for each one. This file is a JSON file, so it must follow JSON syntax. If there are missing open/close brackets, then your MagicMirror display won’t appear as expected (or at all).
After each change to the config.js file, we are going to issue the command to have pm2 restart the MagicMirror application for us:

This default configuration file provides the basic elements we need to make our mirror useful.
- The first section of the config file is general settings for how MagicMirror will run. These are things like language, time format, and list of IP addresses that can access MagicMirror directly such as from a web browser running on another device.
- The next section of the config file is the list of modules enabled and their configuration options.
Let’s Make It Feel Like Home
Each module you configure will also require a position value. You can think about which module position would be right for each module, but each one generally has suggestions from the developer for which position is best.
Let’s set up some of the pre-installed modules before we explore adding third-party modules.
We’ll cover the following modules:
Calendar
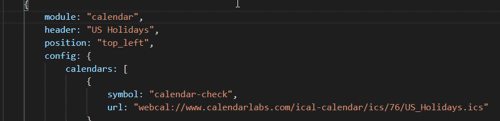
I’m going to add my personal google calendar to my MagicMirror display. By default, the MagicMirror shows a generic feed of US holidays by making use of this default config:
Let’s pull in a Google calendar along with the holiday calendar.
In order to do that, I need to get the private calendar URL so my private calendar can show up.
- First thing is open your Google calendar from the web browser
- Scroll down to the “My Calendars” section and click the three dots next to the calendar you’d like to add:
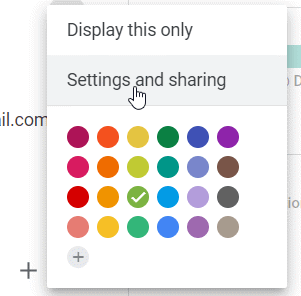
- Click “Settings and sharing”
- Find your “Secret Address in iCal format” and make a note of it
Let’s head back to our config.js and add a new calendar entry:
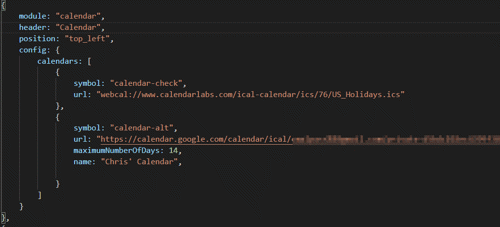
I provided the url from Google’s “Secret Address in iCal format” that we pulled in from the previous steps. I also assigned it a different icon using the symbol so when my personal events come through, I can easily distinguish what is coming from my calendar as opposed to a family or holiday calendar. Check the documentation linked above for more info on icons.
Additionally, I limited the number of days’ worth of events shown to 14 using maximumNumberOfDays
You can have as many calendars as you’d like!
Restart MagicMirror to see your changes:
News
Most people like to have a useful news ticker with information relevant to them. Since this MagicMirror was made mostly for my wife, I’m going to grab some RSS feeds from pop culture news sources and add them in.
By default, we are getting news feed from The New York Times:
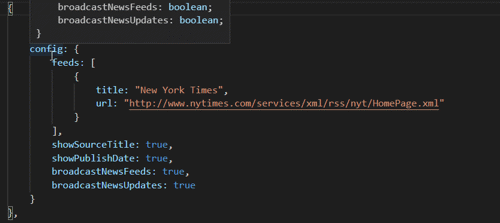
You can use RSS feeds, so I found two basic ones from news websites and replaced the NYT feed with the following:
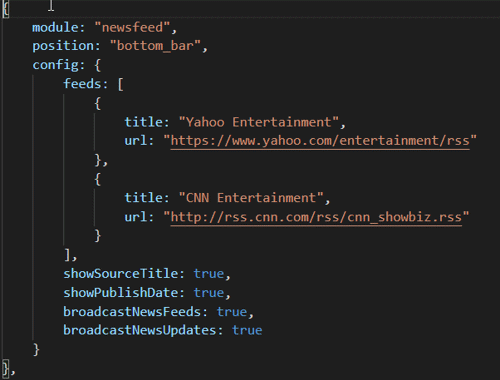
Restart the MagicMirror and see our changes:

Weather
The following built-in modules do require a free API key to retrieve current and forecast weather data from Open Weather Map.
Current Weather
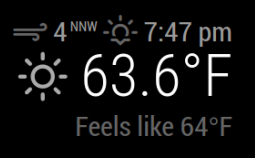
The Default will look like this:
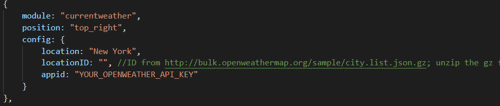
You MUST sign up with Open Weather Map’s free API in order to get weather data
Once you have your API key, you need to find your location ID from Open Weather Map: https://openweathermap.org/find
Now you have your Location ID and your API key. I also want to ensure that the units match US/Imperial units. Let’s update your config.js file:
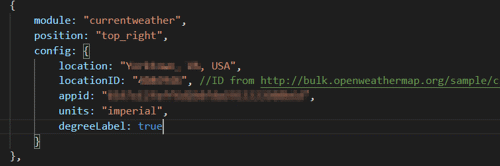
Update your config in similar fashion, then restart MagicMirror to reflect the change:
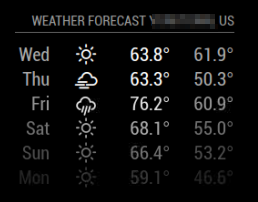
Weather Forecast
Luckily the Forecast module is very similar to the current weather module:
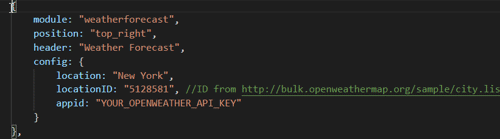
You MUST sign up with Open Weather Map’s free API in order to get weather data
Once you have your API key you need to find your location ID from Open Weather Map: https://openweathermap.org/find
Now you have your Location ID and your API key. I also want to ensure that the units match US/Imperial units. Let’s update your config.js file:
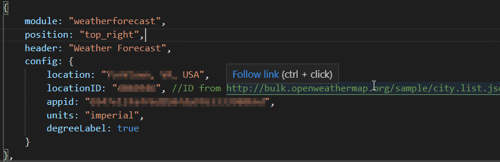
Update your config in similar fashion, then restart MagicMirror to reflect the change:
Clock
The first thing I’m going to do in my config.js is to change the time format to 12-hour format since we are in the US: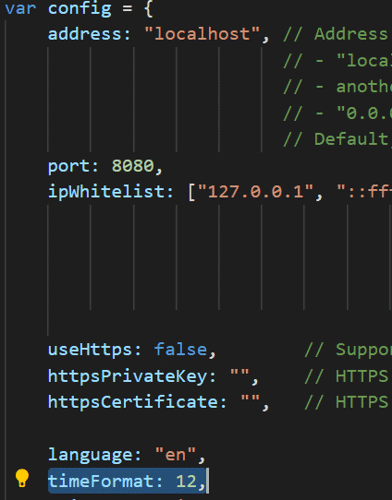
Then I will scroll down to the module section for the clock:
I want to modify this clock module configuration to display the time in a way that matches what we expect in the US, so I will add some configuration parameters to display 12-hour time, show AM/PM, set the time zone, display the seconds, and the sun rise/set and moon rise/set.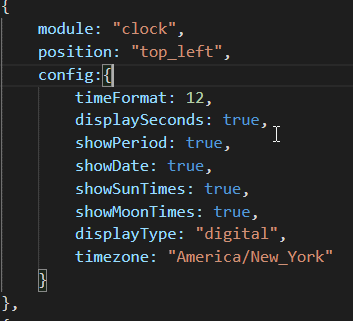
With the config updated I will restart the MagicMirror and the clock will have the format I requested: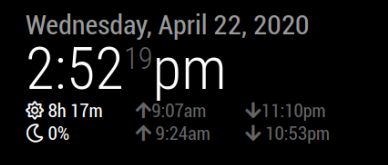
Modules, Modules, Everywhere...
There are a handful of modules that come with the MagicMirror base software, but the most useful that I have found are from third-party developers. There are literally hundreds of them for all kinds of things from local transit schedules to adding Alexa voice control, facial recognition, photo galleries, gestures, and so much more.
Pass the Remote
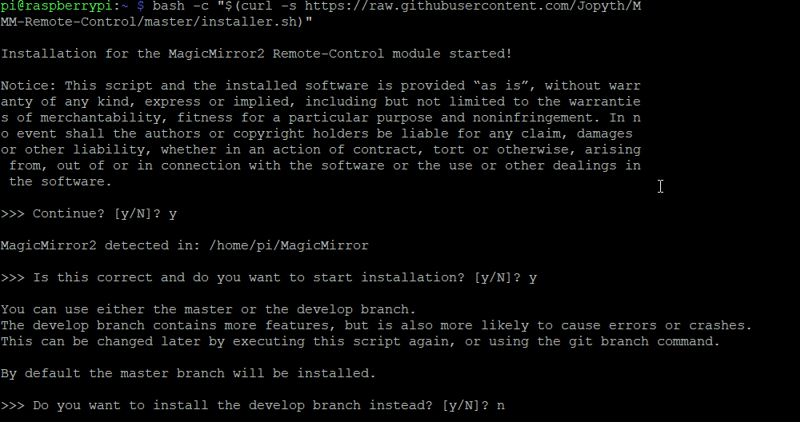
The most useful utility module I have found is MMM-Remote_Control, a web-based remote control app to turn off the display or restart the MagicMirror or Raspberry Pi as needed -- such as at night or when leaving for the day.
Let’s install it:
- Connect to your Raspberry Pi via ssh or by using the terminal:

- The “easy” install will do all the hard work for you:
bash -c "$(curl -s https://raw.githubusercontent.com/Jopyth/MMM-Remote-Control/master/installer.sh)"
bash -c "$(curl -s https://raw.githubusercontent.com/Jopyth/MMM-Remote-Control/master/installer.sh)" - The install script tries to get everything in place, but I have never had it work 100% properly:
- I usually have to at least walk through the manual install steps described here.
- Part of this includes adding some changes to the config.js Modules section to enable the remote-control module and allow other devices to connect to your MagicMirror:
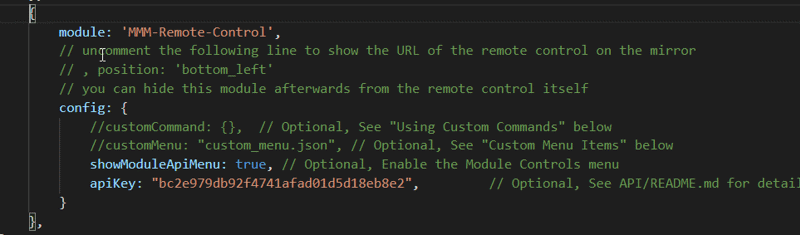
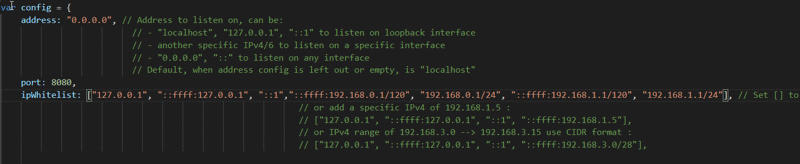
These two changes enable the module and allows other devices to see your MagicMirror.
- If your network is different from 192.168.0.X or 192.168.1.X then please update the ipWhiteList value accordingly.
- I change address from “localhost” to 0.0.0.0 so your Raspberry Pi will listen for external requests.
- Restart your MagicMirror
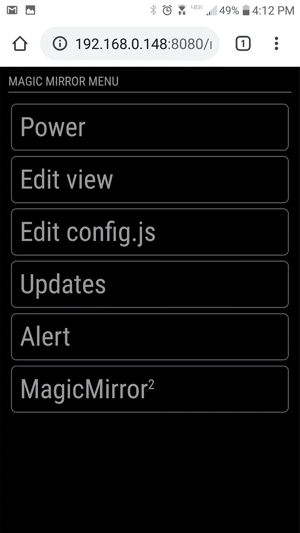
- Now you can use another device’s browser to see your MagicMirror!
- The most useful part of this is when you navigate to the address of your MagicMirror. Get to it at http://xxx.zzz.aaa.bbb:8080/remote.html (replace xxx.zzz.aaa.bbb with IP address of your RaspberryPi).
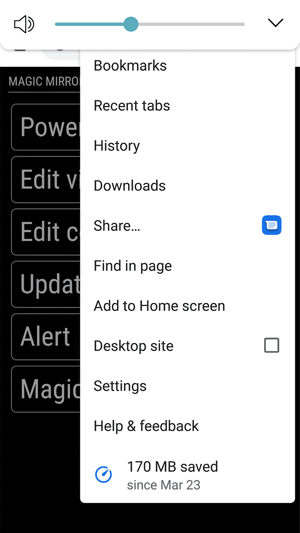
- Then you can add a shortcut to this page to your mobile device’s home screen:
- There are TONS of other things you can do with this module/app so I encourage you to look into the documentation further.
Going the Extra Mile
If you’re feeling adventurous, there are a multitude of other modules and projects you can undertake with MagicMirror. Some require additional hardware while others do not. Like anything involving the Raspberry Pi, the limit is your imagination (and how much time you want to commit to it).
I hope this exercise has piqued your interest in Raspberry Pi and MagicMirror. There are so many awesome project possibilities here that I doubt I will ever run out of fun things to do. Happy tinkering!

Chris MalpassCore Contributor
Chris Malpass is a seasoned software developer and data geek native to Hampton Roads, Virginia. As a Marathon Consultant Chris prides himself on learning and applying new skills quickly. A veteran of the open-source world, Chris is now heavily focused on building solutions based on the .NET framework and Microsoft products. When Chris isn’t helping our clients solve complex problems, he’s likely traveling with his family, reading, or exploring the region with one of his many vintage cameras.