The Importance of Copyediting and Proofreading
February 27, 2024

Introduction to ASP.NET Core Blazor Server
Blazor is a Microsoft-backed open-source web framework that allows you to build interactive web UIs using C# instead of JavaScript. The name is a combination of the words Browser and Razor, the .NET HTML view rendering engine. Blazor comes in three editions: Server, WebAssembly, and Hybrid. Blazor Server was released with .NET Core 3.0 in late 2019. Blazor WebAssembly (or WASM) was released in May 2020 as a part of .NET Core 3.1. Blazor Hybrid was released in November 2022 as part of .NET 7. Server and WebAssembly have continued to be updated and improved and are part of the current (at the time of this blog post) release of .NET 7.
Note that .NET 8, which is scheduled to be released in November of 2023, will include yet another version of Blazor that was at one time called Blazor United. They seem to have dropped that name, but the idea would be to combine the best of server and client development into one package.
With the introduction out of the way, we'll start by looking at the versions of Blazor before diving into the code to build a Blazor Server component.
Blazor Hybrid
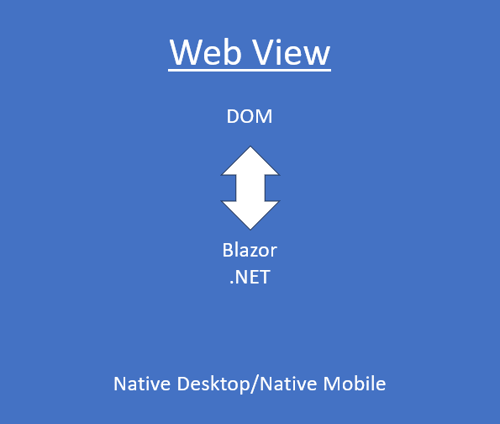
Blazor Hybrid is a client-side implementation of Blazor that allows you to create desktop and mobile applications using C# and .NET. In a Blazor Hybrid app, Razor components run natively and have full access to all the native capabilities of the device that the app is running on. The components are rendered to an embedded Web View control through a local interop channel. Blazor Hybrid lets you build mobile apps using .NET MAUI or Windows apps using WPF or Windows Forms. Note that Blazor hybrid apps do not run in a browser and WASM is not involved.
Blazor WebAssembly
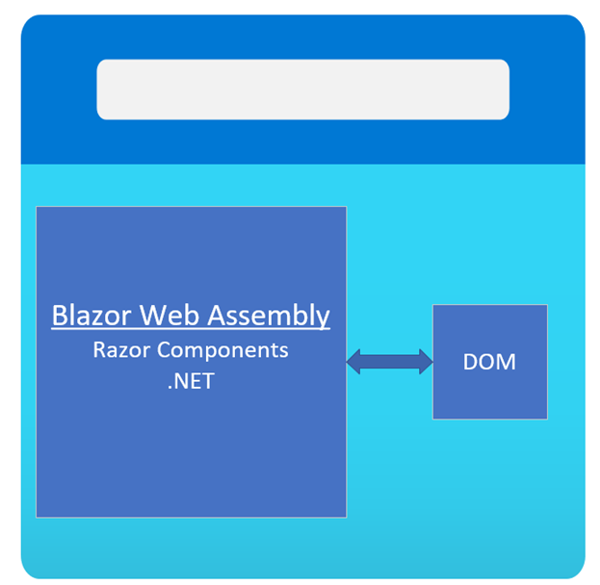
Blazor WebAssembly is a client-side in-browser implementation of Blazor that allows you to write single-page applications (SPAs) using C# and .NET. This is equivalent to what many other client-side frameworks, such as Angular, Vue, and React, allow you to do in JavaScript. While not the focus of this blog post, it is important to note the differences between the 2 editions of Blazor.
Blazor Server
Blazor Server is a server-side implementation of Blazor that allows you to write components in C# and .NET that execute on the server and can interact client-side on the browser. This interaction includes updating UI, handling events, and JavaScript Interop calls through a SignalR connection over the network. SignalR is a part of the ASP.NET framework that adds real-time web functionality to your web applications by giving server code the ability to push content to browser clients rather than having the clients request the data.

There are few things to keep in mind when using Blazor Server:
- The code will primarily execute on the server and is stateful
- State is stored in memory on the server, so scalability can be an issue with a lot of client connections
- SignalR and web sockets are being used behind the scenes so we can avoid unnecessary page refreshes, but the downside is higher latency since there is an extra network call
- The code can access all .NET APIs and server resources directly (like databases and the file system) because it is running on the server
- The app download size is small
- Support for all modern web browsers
- Support for .NET and JavaScript debugging
With these points in mind, the best use case of Blazor Server is line of business applications or general web applications where the users have a permanent network connection.
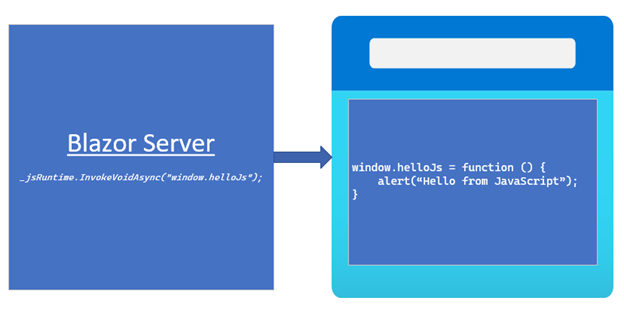
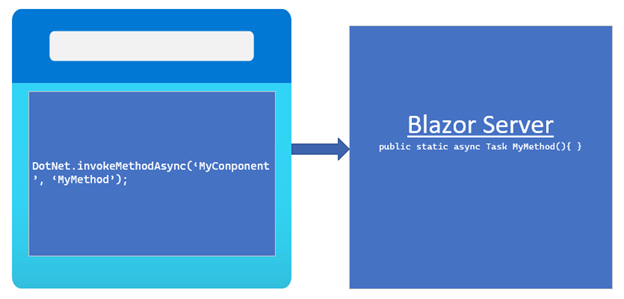
JavaScript Interop
Although you can write Blazor Server components without using any JavaScript, there are times when you may still need to run some JavaScript code. Blazor Server and Blazor WebAssembly can invoke JavaScript functions from .NET and invoke .NET methods from JavaScript functions via JavaScript interoperability. To call JavaScript functions from .NET, Blazor provides an injectable service that implements the IJSRuntime interface. This exposes the InvokeAsync and InvokeVoidAsync methods, the former which allows returning and reading of a value and the latter which does not return a value. For calling .NET methods from JavaScript, Blazor provides the DotNet.invokeMethod() and DotNet.invokeMethodAsync() JavaScript functions, which allow you to pass the assembly name of your Blazor component along with any parameters.
Call JavaScript Function from .NET
Call .NET Method from JavaScript
Razor Components
Blazor Server applications are built using Razor Components, which can also be called Blazor components. A component is simply a self-contained bit of functionality with logic that allows client-side interactivity using the Razor syntax and C# code. Razor has been around for a while now and is the preferred way to build web applications over MVC when using ASP.NET. Razor components are very similar to Razor Views with a few differences, including the user of a .razor extension (instead of .cshtml) and @code{} blocks instead of @functions {} blocks. Razor components have 3 different render modes on the client.
- ServerPrerendered: The component is rendered in HTML on the client and connects back to the server for interactivity.
- Server: The component does not render in HTML on the client but connects back to the server for interactivity.
- Static: The component is rendered in HTML on the client but does not connect back to the server for interactivity.
Adding Blazor Server to a Web Application
You can add Blazor Server functionality to a new or existing web application. For the purposes of this demonstration, we will create a new ASP.NET web application using .NET 6, then add the necessary pieces to make Blazor Server work to give us a complete understanding of what is required. We can then begin building a Blazor Component.
Create a New Web Application
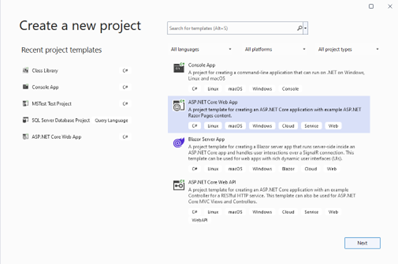
Open Visual Studio 2022 and select File -> New -> Project. Then select the ASP.NET Core Web App template.
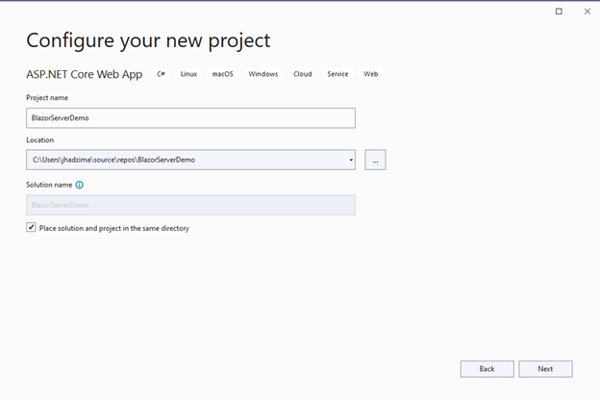
Next, enter the project name, select the folder for the solution, and click on the Next button.
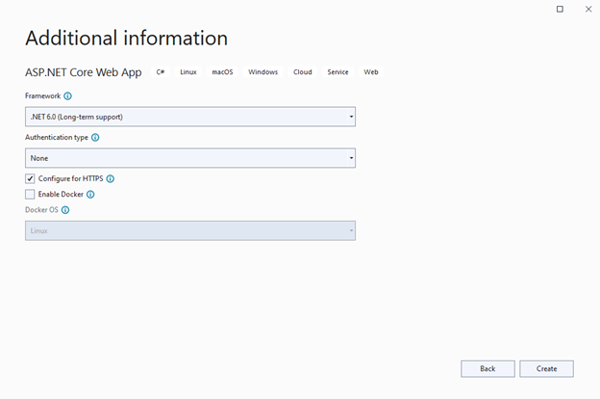
Finally, select the .NET framework, which we will leave at the default of .NET 6, and click on the Create button. While support for Blazor is available back to .NET 3, I would highly recommend using .NET 6 as it has been flagged for long-term support from Microsoft whereas .NET 3 and 5 have not.
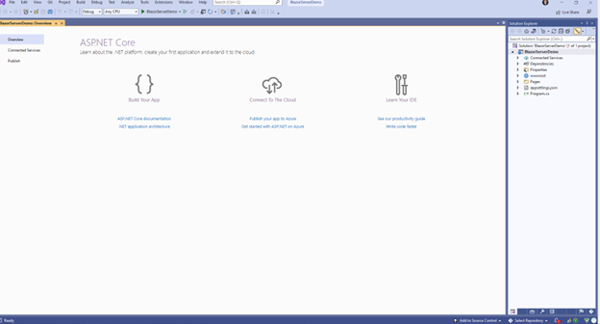
The solution and project will be created and you should see a starter web app in Visual Studio.
Add Blazor Server Prerequisites
With the project created, we now need to add some prerequisites in order to implement Blazor Server. Note that if we had chosen the Blazor Server App template instead of the ASP.NET Core Web App template, this step would be unnecessary. I am including this step so that we have an understanding of what is needed to run Blazor Server and what you need to do if you would like to add Blazor Server to an existing ASP.NET web application.
- Add the AspNetCore.Components.WebAssembly.Server NuGet package to your project.
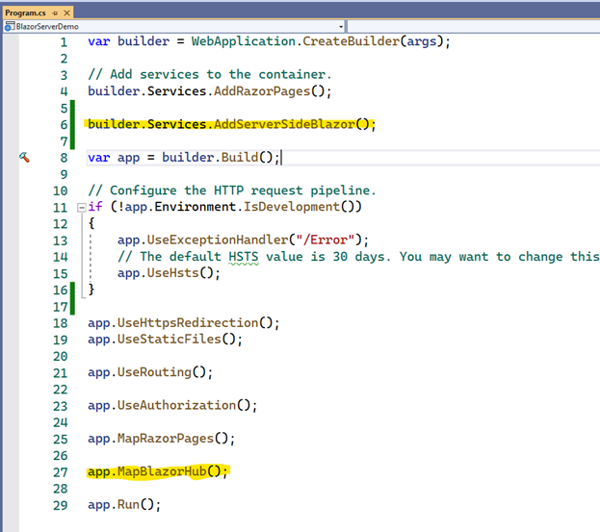
- Add Blazor services (builder.Services.AddServerSideBlazor()) and the SignalR hub (app.MapBlazorHub()) to Program.cs. Note that in .NET 6, the Program.cs and Startup.cs from previous versions of .NET have been combined into a single startup class, Program.cs.
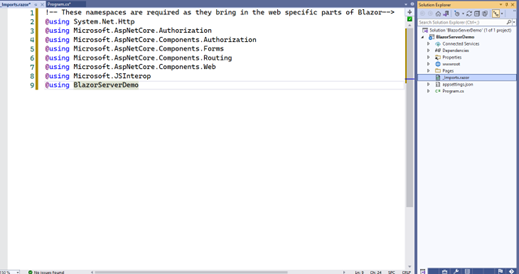
- Add a new code file called _Imports.razor to the project’s root folder. This will bring in the web-specific parts of Blazor.
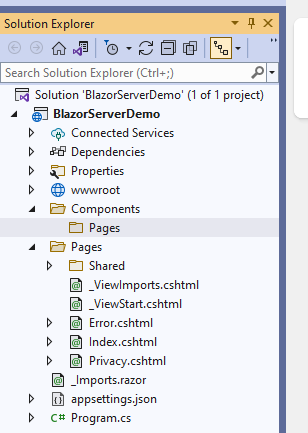
- Create a new folder in the project “/Components/Pages” where our Blazor components will reside.
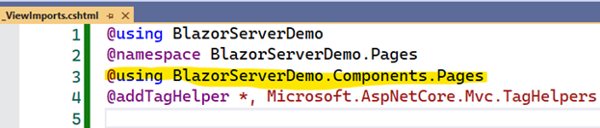
- Add a using statement for the Blazor components folder to _ViewImports so the Blazor components can be discovered.
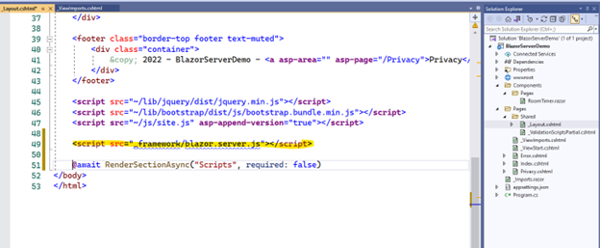
- Add the Blazor Server script reference to the layout template (/Pages/Shared/_Layout.cshtml). Note that this script file resides in the Blazor assembly and does not physically exist, which is why you see the squiggly line underneath it.
With the prerequisites in place, now would be a good time to build the solution just to make sure we do not have any configuration errors.
Blazor Component Overview
Now that we are ready to add a Blazor component, let’s step back and figure out a real-world situation where we could leverage Blazor Server. Let’s use the example of reserving seats for a movie. Typically, you are given a countdown timer on the page that holds your seat selections and lets you checkout. If you do not check out before the time countdown completes, you lose the hold on your seat selection. Some basic goals for this component would be:
- Display a timer that counts down from 5 minutes to 0
- Pass in a parameter for the timer duration
- Maintain the timer state if the user refreshes the page
- When the timer reaches 0, redirect the user away from the seat selection page
Add a Blazor Component
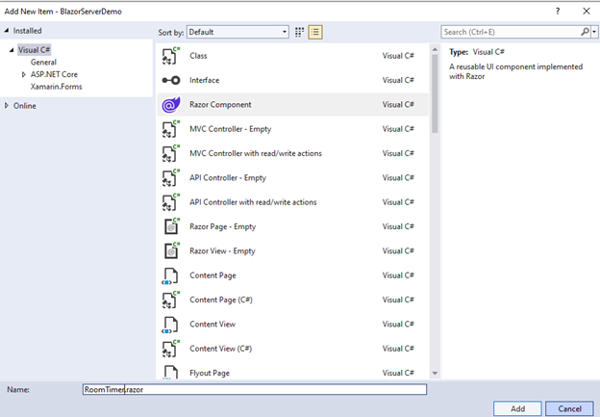
Right-click on the Components/Razor folder and select Add -> New Razor Component. Name the component RoomTimer.razor.
Let’s start with a simple implementation that simply sets a string value in Blazor and displays that value in the client. Enter the following code in the Razor component:
<!-- Blazor component -->
<span>@TestTimeRemaining</span>
@code
{
public string? TestTimeRemaining { get; set; }
protected override void OnInitializedAsync()
{
TestTimeRemaining = "Hello from Blazor";
}
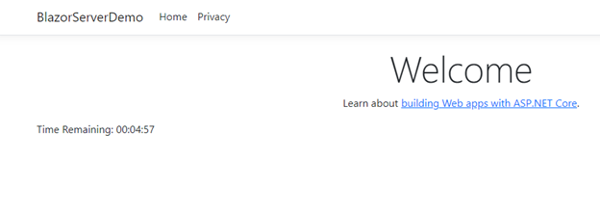
}In Index.html, add the following code to display the value from Blazor:
<div class="row">
<div class="col-md-12">
Time Remaining: <component type="typeof(RoomTimer)" render-mode="Server" />
</div>
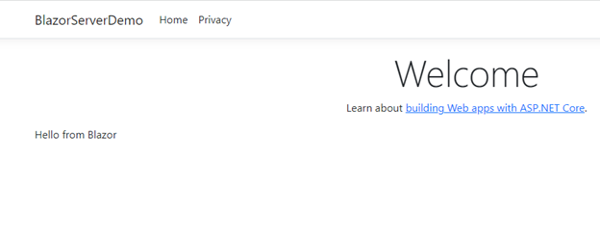
</div>Build and run the application and you should see the following. This confirms all the pieces are in place for Blazor to work properly:
Add a Timer
Now we will make a few changes to implement the countdown timer on the page. Change the code in the Blazor component to match what is show below:
<!-- Blazor component -->
@using System.Timers

@TestTimeRemaining

@code
{
    private static Timer? _timer;

    private int _counter;

    public string? TestTimeRemaining { get; set; }

    protected override void OnInitializedAsync()
    {
        // initialize timer
        _timer = new Timer();
        _timer.Interval = 1000; // 1 second
        _timer.Elapsed += CountDownTimer;
        _timer.Enabled = true;

        _counter = 300; // 5 minutes
    }

    private async void CountDownTimer(object? sender, ElapsedEventArgs e)
    {
        if (_counter > 0)
        {
            // decrement the timer
            _counter -= 1;

            // format the display of the timer
            TestTimeRemaining = new DateTime(TimeSpan.FromSeconds(_counter).Ticks).ToString("HH:mm:ss");

            // tell Blazor to re-render the client component
            await InvokeAsync(async () => { StateHasChanged(); });
        }
    }
}
The first thing to note is the implementation of the Timer object, which we declare with a static modifier so it remains running. The timer’s event handler method called CountDownTimer will execute every 1 second based on the timer’s Interval property. In the event handler, we decrement the timer by -1 and format the time remaining. The final thing we do is call the InvokeAsync with StateHasChanged to let Blazor know that the client component needs to be re-rendered. Build and run and you should see a timer counting down from 5 minutes.
Pass a Parameter
To make the timer component more flexible, we can add a parameter for the timer duration using the code below:
@page
@model IndexModel
@{
    ViewData["Title"] = "Home page";
}

<div class="text-center">
    <h1 class="display-4">Welcome</h1>
    <p>Learn about <a href="https://docs.microsoft.com/aspnet/core">building Web apps with ASP.NET Core</a>.</p>
</div>

<div class="row">
    <div class="col-md-12">
        Time Remaining:  <component type="typeof(RoomTimer)" render-mode="Server" para-DurationInMinutes="5" />
    </div>
</div>
In the component markup, parameters can be added by prefixing the parameter name with “param-”:
<!-- Blazor component -->
@using System.Timers

@TestTimeRemaining

@code
{
    private static Timer? _timer;

    private int _counter;

    [Parameter]
    public int DurationInMinutes { get; set; }

    public string? TestTimeRemaining { get; set; }

    protected override async Task OnInitializedAsync()
    {
        // initialize timer
        _timer = new Timer();
        _timer.Interval = 1000; // 1 second
        _timer.Elapsed += CountDownTimer;
        _timer.Enabled = true;

        _counter = (DurationInMinutes * 60);
    }

    private async void CountDownTimer(object? sender, ElapsedEventArgs e)
    {
        if (_counter > 0)
        {
            // decrement the timer
            _counter -= 1;

            // format the display of the timer
            TestTimeRemaining = new DateTime(TimeSpan.FromSeconds(_counter).Ticks).ToString("HH:mm:ss");

            // tell Blazor to re-render the client component
            await InvokeAsync(async () => { StateHasChanged(); });
        }
    }
}
In the component, add the parameter by declaring a public variable and using the [Parameter] attribute. Build and run and you should still see the countdown timer start at 5 minutes.
Handle Page Refresh
While the timer runs correctly, refresh the webpage and note that the timer starts over from 5 minutes. This does not meet one of our goals for the timer, so make the following code changes to the component:
<!-- Blazor component -->
@using System.Timers
@using Microsoft.AspNetCore.Components.Server.ProtectedBrowserStorage
@inject ProtectedSessionStorage _protectedSessionStore
@implements IDisposable

@TestTimeRemaining

@code
{
    private static Timer? _timer;
    private int _counter;
    private const string ElapsedCounter = "ElapsedCounter";

    public string? TestTimeRemaining { get; set; }

    protected override async Task OnInitializedAsync()
    {
        // check for timer already initialized, user could have hit refresh in browser
        var result = await _protectedSessionStore.GetAsync<int>(ElapsedCounter);

        // if the timer was initialized, set the counter to the stored value,
        // otherwise initialize it to 5 minutes
        _counter = result.Success ? result.Value : 300;

        // initialize timer
        _timer = new Timer();
        _timer.Interval = 1000; // 1 second
        _timer.Elapsed += CountDownTimer;
        _timer.Enabled = true;
    }

    private async void CountDownTimer(object? sender, ElapsedEventArgs e)
    {
        if (_counter > 0)
        {
            // decrement the timer
            _counter -= 1;

            // format the display of the timer
            TestTimeRemaining = new DateTime(TimeSpan.FromSeconds(_counter).Ticks).ToString("HH:mm:ss");
        }

        // tell Blazor to re-render the client component
        await InvokeAsync(async () => { StateHasChanged(); });
    }

    protected override async Task OnAfterRenderAsync(bool firstRender)
    {
        // store the counter value to protected storage
        if (_counter > 0)
            await _protectedSessionStore.SetAsync(ElapsedCounter, _counter);
    }

    public void Dispose()
    {
        _timer?.Dispose();
    }
}
To save the state of the timer counter, we take advantage of ProtectedBrowserStorage. This class was introduced in .NET 5 and is included in the ASP.NET framework. It relies on ASP.NET Core data protection, so it is only available in Blazor Server. That means anything you store is encrypted on the server so only your application can read it. It is also stateful, so we can maintain values that will survive a page refresh. When the page loads, OnInitialized is called where we can check to see if our counter value variable, ElapsedCounter, has been stored in ProtectedBrowserStorage. If it is, then we set the counter to that value and the timer will start from there. If not, we initialize the counter to 5 minutes. We need to use OnAfterRenderAsync because you can only safely run interop code in the this method, so that is where we store the state of the counter after it has been decremented. Now if you build and run the application, you should be able to refresh the page and the timer will maintain its state.
Redirect When Timer Reaches Zero
The last goal for our component is to redirect to a different page when the timer countdown reaches 0. To do so, we make the following changes:
<!-- Blazor component -->
@using System.Timers
@using Microsoft.AspNetCore.Components.Server.ProtectedBrowserStorage
@inject ProtectedSessionStorage _protectedSessionStore
@inject IJSRuntime _jsRuntime
@implements IDisposable

@TestTimeRemaining

@code
{
    private static Timer? _timer;
    private int _counter;
    private const string ElapsedCounter = "ElapsedCounter";

    public string? TestTimeRemaining { get; set; }

    protected override async Task OnInitializedAsync()
    {
        // check for timer already initialized, user could have hit refresh in browser
        var result = await _protectedSessionStore.GetAsync<int>(ElapsedCounter);

        // if the timer was initialized, set the counter to the stored value,
        // otherwise initialize it to 5 minutes
        _counter = result.Success ? result.Value : 300;

        // initialize timer
        _timer = new Timer();
        _timer.Interval = 1000; // 1 second
        _timer.Elapsed += CountDownTimer;
        _timer.Enabled = true;
    }

    private async void CountDownTimer(object? sender, ElapsedEventArgs e)
    {
        if (_counter > 0)
        {
            // decrement the timer
            _counter -= 1;

            // format the display of the timer
            TestTimeRemaining = new DateTime(TimeSpan.FromSeconds(_counter).Ticks).ToString("HH:mm:ss");
        }

        // tell Blazor to re-render the client component
        await InvokeAsync(async () => { StateHasChanged(); });
    }

    protected override async Task OnAfterRenderAsync(bool firstRender)
    {
        // store the counter value to protected storage
        if (_counter > 0)
            await _protectedSessionStore.SetAsync(ElapsedCounter, _counter);
        else
            // call javascript function to redirect to results page
            await _jsRuntime.InvokeVoidAsync("window.redirectToTimeout");
    }

    public void Dispose()
    {
        _timer?.Dispose();
    }
}
We need to first inject IJSRuntime, which will give us the ability to call a JavaScript function from our Blazor component. In the OnAfterRenderAsync, if our counter is 0, meaning the timer has expired, we will call a JavaScript function on the page, redirectToTimeout, using the InvokeVoidAsync method that will redirect the user to the timeout page.
We also need to add the JavaScript function to our webpage to do the redirect as show below:
@page
@model IndexModel
@{
ViewData["Title"] = "Home page";
}
<div class="text-center">
<h1 class="display-4">Welcome</h1>
<p>Learn about <a href="https://docs.microsoft.com/aspnet/core">building Web apps with ASP.NET Core</a>.</p>
</div>
<div class="row">
<div class="col-md-12">
Time Remaining: <component type="typeof(RoomTimer)" render-mode="Server" />
</div>
</div>
<script type="text/javascript">
window.redirectToTimeout = function () {
window.location.href = "/Timeout";
}
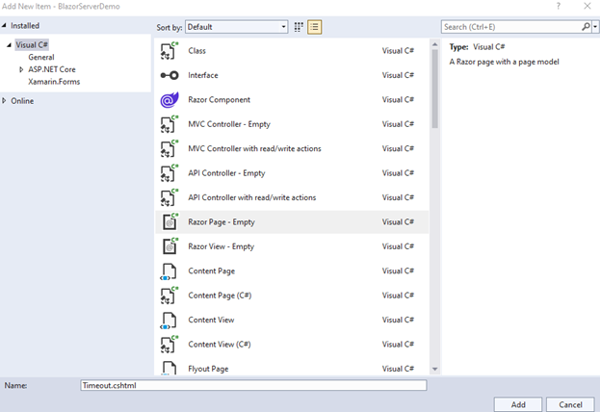
</script>Finally, we need to add a new page called “Timeout” that the redirect goes to.
If you build and run the application, the timer should count down to 0, then redirect to the Timeout page.
Conclusion
Blazor Server is a solid option for adding functionality to a new or existing ASP.NET Core application. Many things that are typically done using JavaScript can be achieved in C# using Blazor Server, plus you get access to all of the .NET and server resources. It should be a part of any .NET developer’s toolkit.

John HadzimaCore Contributor
John Hadzima is a Solutions Architect and Team Lead at Marathon Consulting. A graduate of Old Dominion University with a BSBA in Information Systems, he has been working as a developer in Hampton Roads for over 20 years with a focus on delivering solutions using the Microsoft Stack. When not coding, John enjoys surfing, skiing, biking, golfing, travel, and spending time with his two boys.