The Importance of Copyediting and Proofreading
February 27, 2024

Getting Started with Project Tye
Project Tye is an experimental toolset from Microsoft which helps remove many of the roadblocks first experienced by developers learning to implement a microservice-based architecture. This article focuses on how Project Tye accomplishes this by:
- Running many services with one command,
- Using dependencies in containers, and
- Discovering addresses of other services through convention.
Project Tye also helps with deployment to Kubernetes, but that is not covered in this article.
Project Tye is "experimental," and as such, it is not recommended to take a hard dependency on it into production. However, it is a great tool for developers wanting to learn how to develop a microservices-based architecture.
Getting Started
The Project Tye Github page contains many helpful resources and documentation:
Project Tye can be used with either Visual Studio Code or Visual Studio. However, Visual Studio Code has the Tye extension that is not yet available in Visual Studio. Throughout this article, many examples will use the Visual Studio Code terminal with Powershell.
Install the Project Tye CLI
Project Tye is a global command line tool that can easily be installed by using the dotnet tool install command. Using the terminal window, install the Project Tye CLI with the following command:
dotnet tool install -g Microsoft.Tye --version "0.11.0-*" --add-source https://pkgs.dev.azure.com/dnceng/public/_packaging/dotnet5/nuget/v3/index.jsonThe CLI tool provides several commands. However, for this article, only the run and init commands are explored.
tye
| Command | Description |
|---|---|
| init | create a yaml manifest |
| run | run the application |
| build | build containers for the application |
| push | build and push application containers to registry |
| deploy | deploy the application |
| undeploy | delete deployed application |
Install Docker for Desktop
One of the motivations for using Docker is to not have to install dependent services directly on the developer's workstation. For example, this article will use Redis. Instead of downloading and installing Redis on the workstation, an image can be pulled and ran within Docker. Once the Docker image has been removed, no trace of Redis is left behind on the workstation.
The following documents provide instructions on how to install Docker:
Docker will only be used for the last section when Redis is integrated into the solution.
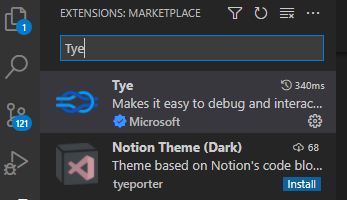
Install the Visual Studio Code Extension
The Project Tye team has made a Tye extension for Visual Studio Code. This extension is very helpful and is referenced throughout this article. It is listed in the Extensions Marketplace as "Tye."
A Simple Example
One way that Tye helps is with service discovery and running multiple projects. From a single command, tye run, multiple projects AND Docker services can be started and all ran within a virtual network. Tye will take care of assigning ports and provides an elegant solution to both service discovery and connection strings.
Start by executing the following commands in a terminal window:
mkdir tyedemo
cd tyedemo

dotnet new razor -o frontend
dotnet new sln
dotnet sln add frontend
This creates a Razor page webapp and a solution file.
In the terminal, enter tye run.
Tye generates output similar to the following:
[10:19:48 INF] Executing application from D:\projects\ProjectTyeBlogArticle\src\tyedemo.sln
[10:19:48 INF] Dashboard running on http://127.0.0.1:8000
[10:19:48 INF] Building projects
[10:19:50 INF] Application tyedemo started successfully with Pid: 17420
[10:19:50 INF] Launching service frontend_ad401214-5: D:\projects\ProjectTyeBlogArticle\src\frontend\bin\Debug\net6.0\frontend.exe
[10:19:50 INF] frontend_ad401214-5 running on process id 11084 bound to http://localhost:51094, https://localhost:51095
[10:19:50 INF] Replica frontend_ad401214-5 is moving to a ready state
[10:19:50 INF] Selected process 11084.
[10:19:50 INF] Listening for event pipe events for frontend_ad401214-5 on process id 11084
The output to highlight is:
- Tye has a dashboard and has started it.
- Tye builds the projects in the solution and then assigns ports.
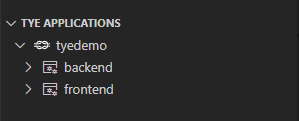
With Tye running, the Tye extension for Visual Studio Code shows the running application. Several icons are displayed when hovering over the application name:
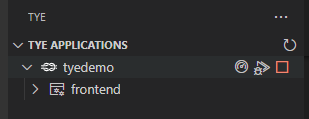
- The first icon will open the Tye dashboard.
- The middle icon will attach Visual Studio Code to the running process for debugging.
- The last icon stops the application. This is the same as entering Ctrl-C in the terminal window.
The frontend service also has three icons:
- The first icon attaches a debugger to the process.
- The middle icon will browse to the service.
- The last icon will open up the service's log.
Tye also has a dashboard that was started with tye run:
[10:19:48 INF] Dashboard running on http://127.0.0.1:8000The dashboard can be displayed by clicking on the link in the output or by entering it into a browser. The dashboard shows the running frontend and provides:

Clicking on the link for logs will display:
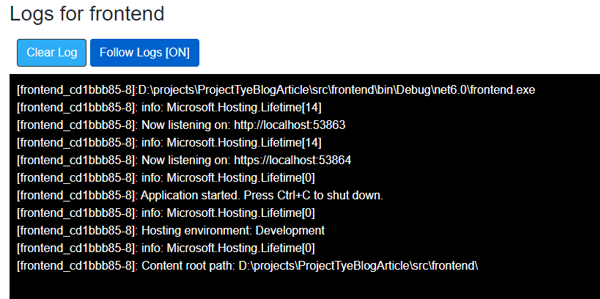
| Column | Description |
|---|---|
| Name | The name of the service. Clicking on the link displays metrics about the running service. |
| Type | The type of services. For the initial demo, this is simply a .NET Project. |
| Source | The location of the code. |
| Bindings | The ports Tye generated and assigned. Clicking on the link will open the website in another tab. |
| Replicas | The number of instances of the service running. By default, it runs only 1 replica, but Tye can be configured to run multiple. |
| Restarts | Lists the number of times the service restarted. This should have 0 restarts, but could indicate something is wrong with the service if it continually resets. |
| Logs | Will display the current log output for the service. |
Stop Tye by entering Ctrl-C in the terminal.
Add a Web API Backend
Adding a Web API as a backend will help demonstrate how Project Tye helps with starting multiple projects and service discovery. It does the latter through a combination of setting environment variables and making use of a package that extends the .NET Core's configuration.
While in the tyedemo directory, enter the following:
dotnet new webapi -o backend
dotnet sln add backend
Running a dir command should list the following:
Mode                LastWriteTime         Length Name
----                -------------         ------ ----
d----         1/16/2022  11:05 AM                backend
d----         1/16/2022  10:14 AM                frontend
-a---         1/16/2022  11:13 AM           1476 tyedemo.sln
Executing tye run in the terminal will start both projects and make port assignments:
[11:52:59 INF] Executing application from D:\projects\ProjectTyeBlogArticle\src\tyedemo.sln
[11:52:59 INF] Dashboard running on http://127.0.0.1:8000
[11:52:59 INF] Building projects
[11:53:03 INF] Application tyedemo started successfully with Pid: 16652
[11:53:03 INF] Launching service frontend_40f23a23-8: D:\projects\ProjectTyeBlogArticle\src\frontend\bin\Debug\net6.0\frontend.exe
[11:53:03 INF] Launching service backend_8e14317f-b: D:\projects\ProjectTyeBlogArticle\src\backend\bin\Debug\net6.0\backend.exe
[11:53:03 INF] frontend_40f23a23-8 running on process id 9340 bound to http://localhost:55044, https://localhost:55045
[11:53:03 INF] Replica frontend_40f23a23-8 is moving to a ready state
[11:53:03 INF] backend_8e14317f-b running on process id 12044 bound to http://localhost:55046, https://localhost:55047
[11:53:03 INF] Replica backend_8e14317f-b is moving to a ready state
[11:53:04 INF] Selected process 9340.
[11:53:04 INF] Selected process 12044.
[11:53:04 INF] Listening for event pipe events for frontend_40f23a23-8 on process id 9340
[11:53:04 INF] Listening for event pipe events for backend_8e14317f-b on process id 12044
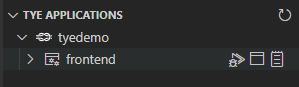
These changes are reflected in both the Tye extension and the dashboard:
Enter the following command into the terminal to list any running docker images: docker ps -a. There shouldn’t be any packages related to the current project.
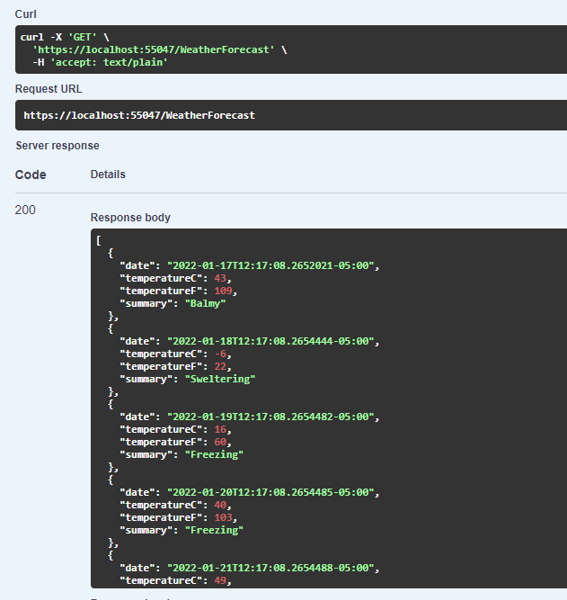
The backend contains the standard "WeatherForecast" endpoint which returns a random five-day forecast:
Stop Tye by entering Ctrl-C in the terminal.
Using the Backend Service
In the frontend project, a class to represent the WeatherForecast data is returned by the backend.
1. Add a new class called WeatherForecast.cs:
namespace frontend;
public class WeatherForecast
{
    public DateTime Date { get; set; }

    public int TemperatureC { get; set; }

    public int TemperatureF => 32 + (int)(TemperatureC / 0.5556);

    public string Summary { get; set; }
}
This uses the C# 10 conventions for namespace and global using directives. Reference What's new in C# 10.
2. Add a typed HttpClient class called WeatherClient to the frontend project:
using System.Text.Json;

namespace frontend;

public class WeatherClient
{
    private readonly JsonSerializerOptions options = new JsonSerializerOptions()
    {
        PropertyNameCaseInsensitive = true,
        PropertyNamingPolicy = JsonNamingPolicy.CamelCase,
    };

    private readonly HttpClient client;

    public WeatherClient(HttpClient client)
    {
        this.client = client;
    }

    public async Task<WeatherForecast[]> GetWeatherAsync()
    {
        var responseMessage = await this.client.GetAsync("/weatherforecast");
        var stream = await responseMessage.Content.ReadAsStreamAsync();
        return await JsonSerializer.DeserializeAsync<WeatherForecast[]>(stream, options);
    }
}
3. Add a reference to the tye extensions package in the frontend project:
dotnet add frontend/frontend.csproj package Microsoft.Tye.Extensions.Configuration --version "0.4.0-*"
4. Add the WeatherClient to the service collection and configure it in the frontend's Program.cs class:
// Add services to the container.
builder.Services.AddRazorPages();

builder.Services.AddHttpClient<WeatherClient>(client =>{
    client.BaseAddress = builder.Configuration.GetServiceUri("backend");
});
Be sure to add using frontend; at the top of Program.cs
With .NET 6, ASP.NET Core combines the Startup.cs and the Program.exe. Refer to What's new in ASP.NET Core 6.0
The GetServiceUri is part of the Tye Configuration Extensions. Specifying the backend service's name will connect to the backend service's base url. This extension method allows Tye to perform service discovery. No modifications to the applicationSettings.json file are required.
5. Open the Index.cshtml.cs file in the frontend solution and add the following code:
public WeatherForecast[] Forecasts { get; set; }

public async Task OnGet([FromServices] WeatherClient client)
{
    Forecasts = await client.GetWeatherAsync();
}
6. Update the Index.cshtml to render the Forecasts array:
@page
@model IndexModel
@{
    ViewData["Title"] = "Home page";
}

<div class="text-center">
    <h1 class="display-4">Welcome</h1>
    <p>Learn about <a href="https://docs.microsoft.com/aspnet/core">building Web apps with ASP.NET Core</a>.</p>
</div>

Weather Forecast:

<table class="table">
    <thead>
        <tr>
            <th>Date</th>
            <th>Temp. (C)</th>
            <th>Temp. (F)</th>
            <th>Summary</th>
        </tr>
    </thead>
    <tbody>
        @foreach (var forecast in @Model.Forecasts)
        {
            <tr>
                <td>@forecast.Date.ToShortDateString()</td>
                <td>@forecast.TemperatureC</td>
                <td>@forecast.TemperatureF</td>
                <td>@forecast.Summary</td>
            </tr>
        }
    </tbody>
</table>
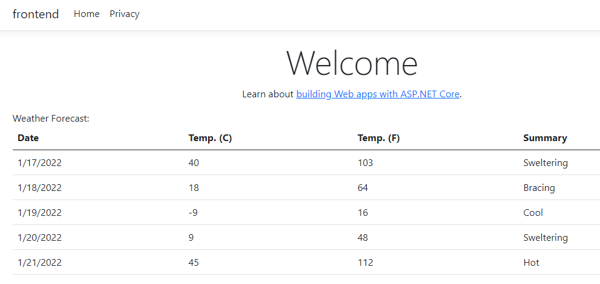
7. Enter tye run in the terminal. From either the dashboard or the extension, browse to the frontend service. The frontend should make the API call to the backend and render the random weather forecast:
Caching Weather Results with Redis
Currently, the backend service will randomly create a five-day forecast each time. Using Redis caching will demonstrate how tye makes using Docker containers much easier. All code changes occur in the backend service.
Modifying the Backend Service
1. Add required using statements to the top WeatherForecastController controller:
using Microsoft.Extensions.Caching.Distributed;
using System.Text.Json;
2. Modify the Get() method in the WeatherForecastController:
[HttpGet]
public async Task<string> Get([FromServices]IDistributedCache cache)
{
    var weather = await cache.GetStringAsync("weather");

    if (weather == null)
    {
        var rng = new Random();
        var forecasts = Enumerable.Range(1, 5).Select(index => new WeatherForecast
        {
            Date = DateTime.Now.AddDays(index),
            TemperatureC = rng.Next(-20, 55),
            Summary = Summaries[rng.Next(Summaries.Length)]
        })
        .ToArray();

        weather = JsonSerializer.Serialize(forecasts);

        await cache.SetStringAsync("weather", weather, new DistributedCacheEntryOptions
        {
            AbsoluteExpirationRelativeToNow = TimeSpan.FromSeconds(5)
        });
    }
    return weather;
}
3. Add a package reference to Microsoft.Extensions.Caching.StackExchangeRedis to the backend service:
cd backend/
    dotnet add package Microsoft.Extensions.Caching.StackExchangeRedis
    cd ..
4. Register and configure StackExchangeRedis. Using .NET 6, this is done in the Program.cs class of the backend project:
builder.Services.AddControllers();
    builder.Services.AddEndpointsApiExplorer();
    builder.Services.AddSwaggerGen();

    // Add Redis
    builder.Services.AddStackExchangeRedisCache(opt => {
        opt.Configuration = builder.Configuration.GetConnectionString("redis");
    });
5. Ensure that all files have been saved and the WeatherForecast project builds:
dotnet clean
dotnet build
Resolve any build errors before moving on.
Generating the Tye YAML File
Tye uses a YAML file to configure services which are not part of the Solution file. For this example, Redis will be added.
Start by entering tye init in the terminal. Tye will generate a tye.yml:
name: tyedemo
services:
- name: frontend
  project: frontend/frontend.csproj
- name: backend
  project: backend/backend.csproj
Edit this file and add redis and redis-cli to the services collection:
name: tyedemo
services:
- name: frontend
  project: frontend/frontend.csproj
- name: backend
  project: backend/backend.csproj
- name: redis
  image: redis
  bindings:
  - port: 6379
    connectionString: "${host}:${port}"
- name: redis-cli
  image: redis
  args: "redis-cli -h redis MONITOR"
Services with an image attribute are Docker images hosted on Dockerhub.
Enter tye run in the terminal window.
[11:44:17 INF] redis: latest: Pulling from library/redis
What did tye run do?
- It pulled a container from Docker.
- It started the Redis Docker image.
- It created proxy containers for the backend and frontend.
- It created a Docker network and added all of the containers to it.
- It added environment variables for the redis connection string (including the correct Host and Port that tye generated).
The Tye extension will show the running services:
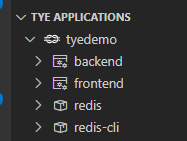
The Tye dashboard also reports the services which are running:
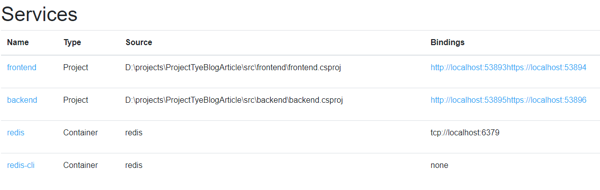
Open the frontend application in a browser. Refreshing the screen returns the cached version until the default cache expires (approximately 5 seconds).
Shut down tye by entering Ctrl-C in the terminal.
Conclusion
Hopefully this article was useful in introducing a tool from Microsoft that is very helpful. The example can be extended upon by learning how to add additional Docker images to the tye.yaml file, such as MongoDb. Project Tye is a promising tool for making the developer's inner-loop experience with microservices much easier.

Chuck BryanCore Contributor
Chuck has been developing line of business applications for over 20 years in Hampton Roads. His first computer was a Commodore 128, where he learned to program Basic. Chuck loves to share what he has learned with others and when not coding, Chuck likes to spend time with his wife, Cindy, and two daughters, Katie and Megan.